previously, you learned about installing WordPress with Nginx. In this article, you will learn how to install WordPress with Apache in Ubuntu 20.04. Certainly, you know about WordPress, a free and open-source popular platform for building websites that are most used because of being easy to install, learn, and use, highly pluggable and customizable too.
Table of Contents
How to install WordPress with Apache in Ubuntu 20.04
As we are going to present how to install the latest version of WordPress with Apache in Ubuntu 20.04, you need to have the LAMP stack installed and well configured for hosting websites. In case you have not installed it yet, see our guide:
Tutorial Install the Latest phpMyAdmin on Ubuntu 20.04 Linux
Installing WordPress in Ubuntu 20.04
After installing the LAMP (Apache, MariaDB, and PHP) stack begin to download the latest version of WordPress
wget -c http://wordpress.org/latest.tar.gz Then, extract the archived file.
tar -xzvf latest.tar.gzOnce, you extracted WordPress directory, move it into your document root i.e. /var/www/html/ and under your website. To create a mysite.com directory and move WordPress files under it, run the following command.
Note: Replace mysite.com with your website’s name or domain name.
ls -l sudo cp -R wordpress /var/www/html/mysite.com ls -l /var/www/html/Now, you can set appropriate permissions on the website (/var/www/html/mysite.com) directory.
Note: It should be owned by the Apache2 user and group called www-data.
sudo chown -R www-data:www-data /var/www/html/mysite.com sudo chmod -R 775 /var/www/html/mysite.comCreating a WordPress database for website
In this step, by using the MySQL command with -u flag to supply the username which should be root and -p to enter a password that you set for the MySQL root account when you installed the MariaDB software, log into MariaDB database shell.
sudo mysql -u root -p To create your site’s database and a database user with privileges, after login in, run the below command.
Note: Replace “mysite”, “mysiteadmin” and “SecureP@ssHere!” with your database name, database username, and the user’s password
MariaDB [(none)]> CREATE DATABASE mysite;MariaDB [(none)]> GRANT ALL PRIVILEGES ON mysite.* TO 'mysiteadmin'@'localhost' IDENTIFIED BY 'SecureP@ssHere!'; MariaDB [(none)]> FLUSH PRIVILEGES;MariaDB [(none)]> EXITNow, create a wp-config.php file from the sample configuration file provided, by moving into your website’s document root.
cd /var/www/html/mysite.com sudo mv wp-config-sample.php wp-config.phpNext, open the wp-config.php configuration file for editing.
sudo vim wp-config.phpThen, you need to update the parameters of the database name, database user, and the user’s password created above.

Buy Linux Virtual Private Server
Creating Apache VirtualHost for WordPress Website
It is Time to configure Apache webserver to serve your WordPress site. You need to create a Virtual Host for it under the Apache configuration. it should be with your fully qualified domain name.
In the following, to create a new file under the /etc/apache2/sites-available/ directory, create and activate a new Virtual Host.
Note: in this tutorial, you will call the file mysite.com.conf and it should end with the .conf extension)
sudo vim /etc/apache2/sites-available/mysite.com.confThen, replace the ServerName and ServerAdmin emails with your values and copy and paste the following configuration in it.
<VirtualHost *:80> ServerName mysite.com ServerAdmin webmaster@localhost DocumentRoot /var/www/html/mysite.com ErrorLog ${APACHE_LOG_DIR}/error.log CustomLog ${APACHE_LOG_DIR}/access.log combined </VirtualHost> 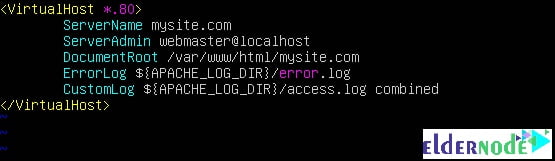
You can save and close it now.
Then to be able to enable the new site and reload the apache2 service to apply the new changes, you should check if the Apache configuration is correct for syntax or not.
apache2ctl -t sudo a2ensite mysite.com.conf sudo systemctl reload apache2We should also mention that, to let your new site load properly from a web browser, you need to disable the default, virtual host.
sudo a2dissite 000-default.conf sudo systemctl reload apache2 Completing the WordPress installation via the web interface
Now, you will learn how to complete the WordPress installation using the web installer. Open your browser and navigate using your site’s domain name.
http://mysite.com.The next you can do after loading the WordPress web installer is to pick the language you wish to use for installation and click Continue.
Now, you can set your site’s title (administrative username, password, and an email) for managing your site content. Then click Install WordPress.
So clear that you will click on Log in to access your site’s administrative login page, after installing the WordPress.
Finally, you would be able to log into your new WordPress website, by using your administrative credentials and start to customize your site from Dashboard.
Dear user, we hope you would enjoy this tutorial, you can ask questions about this training in the comments section, or to solve other problems in the field of Eldernode training, refer to the Ask page section and raise your problems in it.
Also, read