[Updated] IIS is a flexible, secure, and manageable Web server for hosting anything on the Web. In IIS, password protection is achieving by removing anonymous user access to a directory or file. To do this, You can add the Deny rule to the Anonymous User directly to your application’s web.config file, or go through the steps in IIS Manager. Regarding server security, it is important for users and business owners to make sure that these sections are not insecure and are not visible to users when creating new sections on the website. There are many ways to lock a folder or a domain when creating it. This will safeguard a folder or an entire site using the security feature built into IIS called password protection. In this article, you will learn How To Password Protect Folders In IIS. Choose your considered plan on Eldernode to purchase your own VPS Hosting server.
Table of Contents
Tutorial Password Protect Folders In IIS [2012]
IIS is the default web server that is integrated with the Windows server software packages. IIS has a graphical interface, using for managing the Microsoft Windows server. To not leave your website’s sections insecure and visible to users while it is building, you need to lock a folder or domain, So, join us with this article to review the ways you can do to password protect folders in IIS.
Introduction to Password Protection
One of the features that IIS has implemented, is called .Net Authorization. These features allow you to make custom rules sets that will delineate who has access to a folder or website.
There are multiple options we have available to select when adding these custom, allow or deny rules. Some of these rules include the following options:
1_ All users: This rule will deny access to a folder for any user who attempts to access it.
If you would like to block content for everyone, make sure that this rule is on top of the list of all other rules.
2_ All anonymous users: This rule will block access to all users that are not authenticated. In other words, any user attempting to access the folder or site must have specific access granted.
Any user who needs access must be added to the Users and Groups section, otherwise, it will be blocked.
3_ Specified roles or user groups: This rule will block access to all users that do not have a basic or custom user account and password set up.
How to Block everyone Access
To block everyone from accessing, follow these steps:
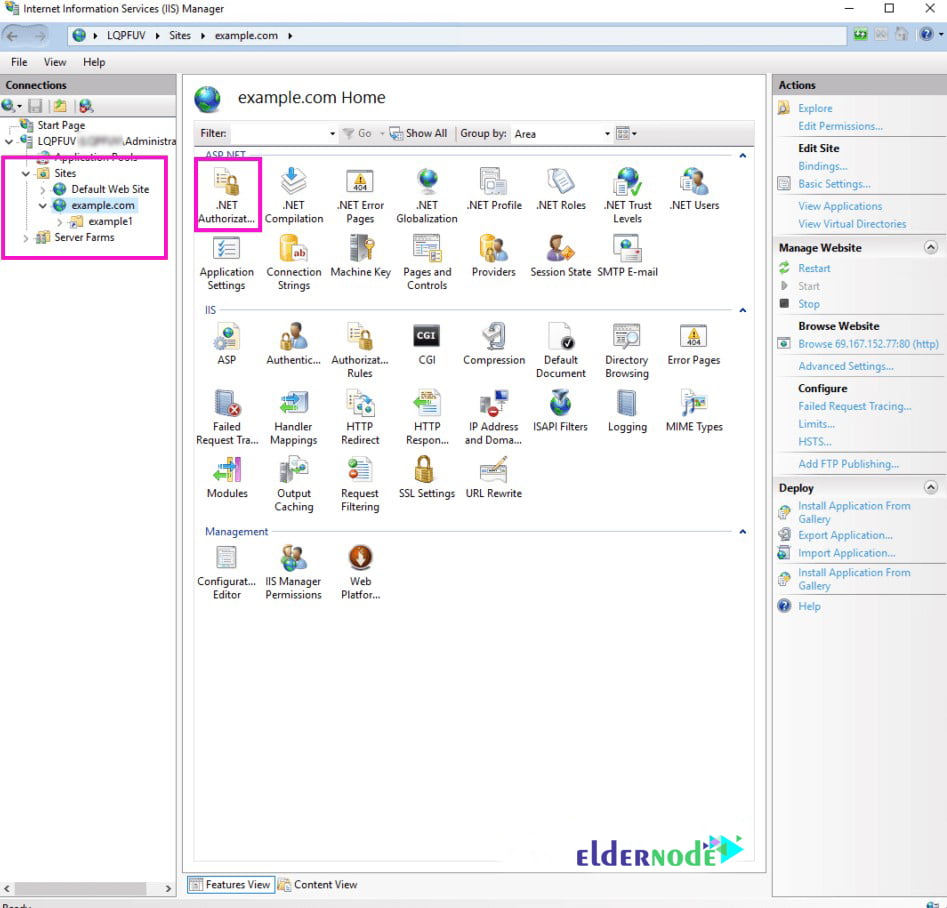
Open your IIS Manager from the Windows Start button.
Select the site that you want to edit from the left side menu.
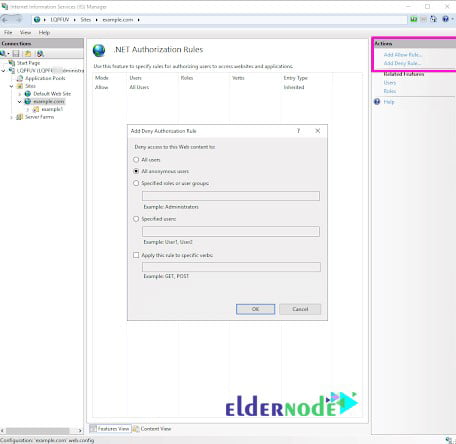
Open the .Net Authorization rules and Click on add rule and select the type of rule you would like to add.
Now, you should specify the users it will apply to:
Click OK.
Your site now has a custom rule in place. You can add as many custom rules as you would like:
Custom Folder Protection
Another method using for authentication and protection is called authentication. In this section, you have multiple options that are available to modify:
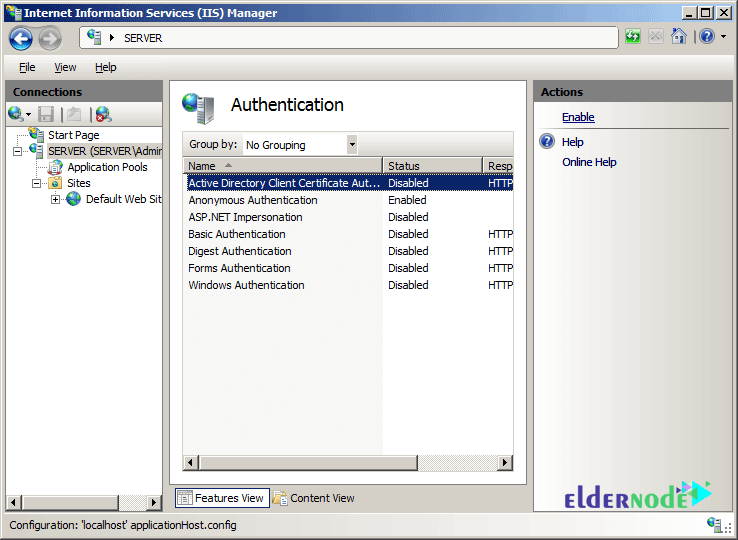
1. Active Directory Client Certificate Authentication:
This is a form of authentication that requires the IIS 7 server to be a member of the Active Directory domain as well as the user accounts that are stored in the active directory.
2. Anonymous Authentication:
This is a feature that provides access to the public areas of your website. If FTP is enabled, by default it will allow users to access the contents of the site.
3. ASP. NET Impersonation:
This is a security feature that allows specific users to execute code.
This feature is using for anonymous users who do not have credentials.
4. Basic Authentication:
This option provides access to users that have accounts on the server’s domain.
In order to access the public-facing content, basic authentication should be enabled to allow the user to set a password in Local Users and Groups.
Note: When accessing content, passwords are sent via a clear text format and as such, considered insecure.
5. Digest Authentication:
This option is similar to Basic Authentication, but credentials are sent in a more secure manner using hashing instead of plain text. This method provides more security and also requires a user’s password to be set.
6. Forms Authentication:
This option works by authenticating the user by reviewing the forms’ authentication ticket, which is usually included within the user’s collection of cookies.
7. Windows Authentication:
Windows authentication option is using in a more corporate setting, or when numerous users are present within a network. This certification uses Windows-based authentication between a client and the Windows IIS server to verify the user who is attempting access must have a Windows account.
How to use Basic Authentication and Digest authentication
In all the options we have seen for protecting folders, we find it is best to use Basic Authentication or Digest authentication. Both options require a username and password.
Let’s review how to set this up:
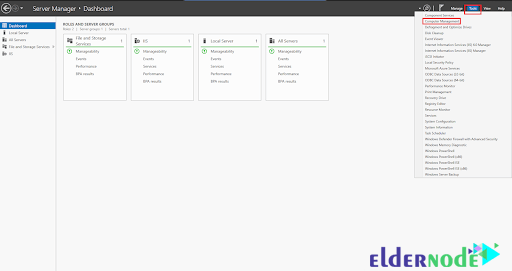
1.Open the Server Manager dashboard.
2. On the right side under Tools select Computer Management.
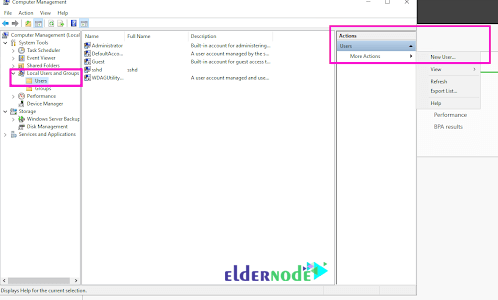
3. Navigate to the Local Users and Groups section.
4. Click on the Users and on the right side select More Actions >> New User.
5. Here you can set up a new username and password for a user, and once complete, save it to provide access.
6. To select a folder, let’s open our IIS Manager and select the site or folder that you want to limit access to.
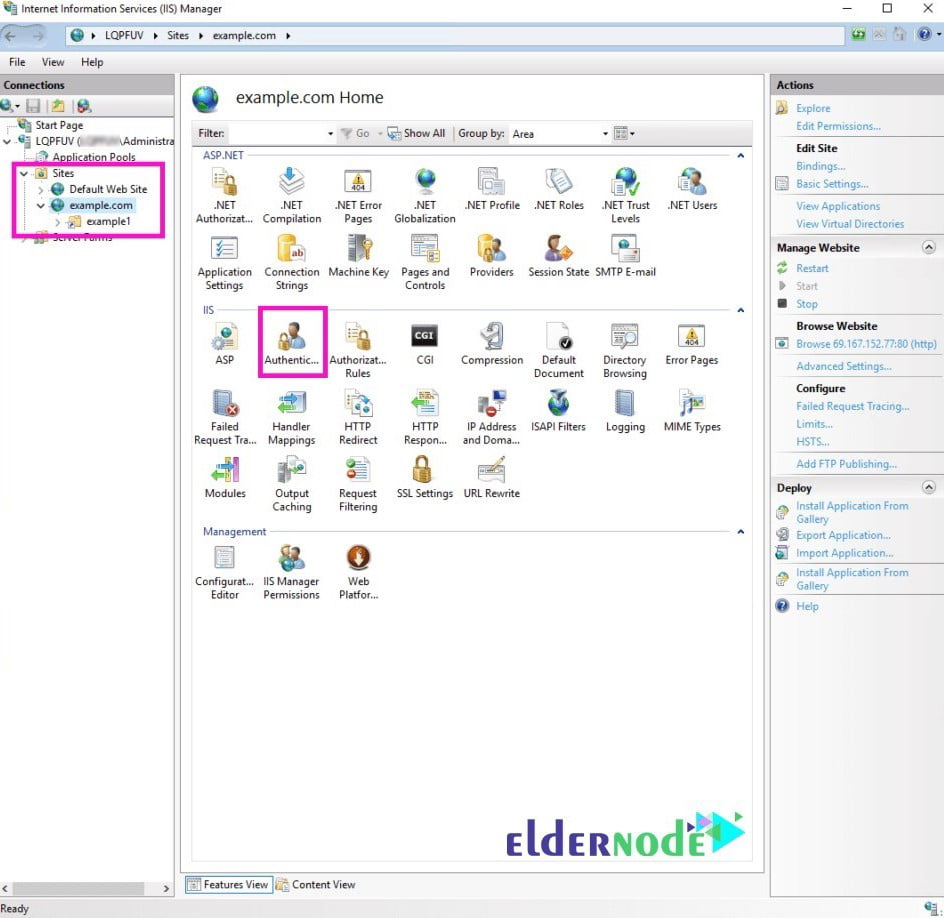
7. The types of authentication section will open.
Note: Disable Anonymous Authentication and enable Basic or Digest authentication for a site or folder.
Conclusion
In this article, you learned How To Password Protect Folders In IIS. From now on you can safely work on your website without external users having access to it until you are completing it since you have setup domain and folder security. If you are interested in learning more, refer to How to Password Protect Sites in Plesk.