Special Offer
 How to Setup MPLS on MikroTik [Step-by-Step]


Setup MPLS on MikroTik isn’t hard once you see it in action. Basically, each packet gets a little label that tells your routers exactly where to send it, no more messing around with IP routes all the time. It’s like giving each packet a shortcut through your network.
Want to try it out safely? Spin up a MikroTik VPS from Eldernode and play around, this way you can experiment without touching a real network and really see how it works.
MPLS Benefits You’ll Actually Notice
Here’s what makes MPLS really handy in real networks:
Easy setup: You can link different routers and sites without juggling messy IP rules.
Speedy traffic: Packets zip through the network using labels, no slow IP checks.
No core BGP headaches: Most of the time, you can skip dealing with Border Gateway Protocol in the core.
Better traffic control: Send data where it needs to go without bottlenecks.
Hands-on: Setting Up MPLS on MikroTik
Alright, let’s dive in and get MPLS running on MikroTik. Picture this: three main provider routers and three provider edge routers, all set up so you can see how the packets zip through the network using labels. We’ll go step by step, so you can try it yourself and actually watch how it works.
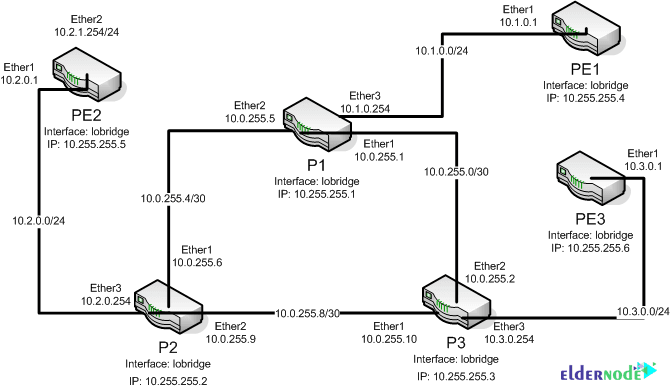
The first step is to create a Loopback interface on all devices. Since it does not matter if there are multiple links between the two routers because only one LDP session is created, the Loopback interface can also be used for LSR ID and Transport Address.
Note the following commands:
P1
/interface bridge add name=lobridge
/ip address add address=10.255.255.1/32 interface=lobridge
Note that the other routers are set to 10.255.255.2-6 as shown above:
P2
/interface bridge add name=lobridge
/ip address add address=10.255.255.2/32 interface=lobridge
P3
/interface bridge add name=lobridge
/ip address add address=10.255.255.3/32 interface=lobridge
PE1
/interface bridge add name=lobridge
/ip address add address=10.255.255.4/32 interface=lobridge
PE2
/interface bridge add name=lobridge
/ip address add address=10.255.255.5/32 interface=lobridge
PE3
/interface bridge add name=lobridge
/ip address add address=10.255.255.6/32 interface=lobridge
IP Addressing training
Next you need to configure the IP addresses of the Ethernet interfaces of the devices. Check the following commands for this purpose:
P1
/ip address
add address=10.0.255.1/30 interface=ether1
add address=10.0.255.5/30 interface=ether2
add address=10.1.0.254/24 interface=ether3
P2
/ip address
add address=10.0.255.6/30 interface=ether1
add address=10.0.255.9/30 interface=ether2
add address=10.2.0.254/24 interface=ether3
P3
/ip address
add address=10.0.255.10/30 interface=ether1
add address=10.0.255.2/30 interface=ether2
add address=10.3.0.254/24 interface=ether3
PE1
/ip address
add address=10.1.0.1/24 interface=ether1
PE2
/ip address
add address=10.2.0.1/24 interface=ether1
PE3
/ip address
add address=10.3.0.1/24 interface=ether1
Configuring OSPF for Dynamic Routing
In this section, you must set up a Dynamic Routing that the network is fully reachable. By doing this, LDP will be able to start the MPLS Core network on your network.
P1
/routing ospf instance
set distribute-default=never redistribute-connected=as-type-1 router-id=10.255.255.1 numbers=default
/routing ospf network
add area=backbone network=10.0.255.0/30
add area=backbone network=10.0.255.4/30
add area=backbone network=10.1.0.0/24
P2
/routing ospf instance
set distribute-default=never redistribute-connected=as-type-1 router-id=10.255.255.2 numbers=default
/routing ospf network
add area=backbone network=10.0.255.8/30
add area=backbone network=10.0.255.4/30
add area=backbone network=10.2.0.0/24
P3
/routing ospf instance
set distribute-default=never redistribute-connected=as-type-1 router-id=10.255.255.3 numbers=default
/routing ospf network
add area=backbone network=10.0.255.0/30
add area=backbone network=10.0.255.8/30
add area=backbone network=10.3.0.0/24
PE1
/routing ospf instance
set distribute-default=never redistribute-connected=as-type-1 router-id=10.255.255.4 numbers=default
/routing ospf network
add area=backbone network=10.1.0.0/24
PE2
/routing ospf instance
set distribute-default=never redistribute-connected=as-type-1 router-id=10.255.255.5 numbers=default
/routing ospf network
add area=backbone network=10.2.0.0/24
PE3
/routing ospf instance
set distribute-default=never redistribute-connected=as-type-1 router-id=10.255.255.6 numbers=default
/routing ospf network
add area=backbone network=10.3.0.0/24
It should be noted that after performing the above steps, you should now have an OSPF rooted system:
Activating MPLS LDP on Your Routers
Finally, you need to go to the Ethernet interfaces that are supposed to be on the MPLA Core network and enable LDP on them:
P1
/mpls ldp
set enabled=yes lsr-id=10.255.255.1 transport-address=10.255.255.1
/mpls ldp interface
add interface=ether1
add interface=ether2
add interface=ether3
P2
/mpls ldp
set enabled=yes lsr-id=10.255.255.2 transport-address=10.255.255.2
/mpls ldp interface
add interface=ether1
add interface=ether2
add interface=ether3
P3
/mpls ldp
set enabled=yes lsr-id=10.255.255.3 transport-address=10.255.255.3
/mpls ldp interface
add interface=ether1
add interface=ether2
add interface=ether3
PE1
/mpls ldp
set enabled=yes lsr-id=10.255.255.4 transport-address=10.255.255.4
/mpls ldp interface
add interface=ether1
PE2
/mpls ldp
set enabled=yes lsr-id=10.255.255.5 transport-address=10.255.255.5
/mpls ldp interface
add interface=ether1
PE3
/mpls ldp
set enabled=yes lsr-id=10.255.255.6 transport-address=10.255.255.6
/mpls ldp interface
add interface=ether1
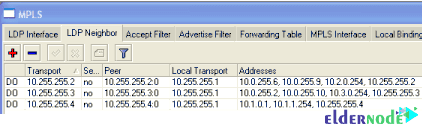
Now in the LDP Neighbor section in the MPLS tab, your LDP neighbors should be shown to you.
You can also use the following command:
mpls ldp neighbor print
Conclusion
So, that’s MPLS in action. Instead of old-school IP routing, your packets now follow labels, which makes traffic faster and less messy. Setting it up on MikroTik isn’t as scary as it sounds, you’ve seen all the steps here. Now it’s just a matter of trying it out and seeing your network run smoother. After this, you’ll see how MPLS makes multi-site routing feel much simpler and faster.