Special Offer
 How to Force Uninstall SQL Server 2019 on Windows


Ever had a SQL Server 2019 installation that just won’t uninstall? It’s annoying, right? Sometimes the usual removal methods fail, or a corrupted install blocks the process. If you need to Force Uninstall SQL Server 2019 on Windows, you’re definitely not the only one dealing with this.
In this guide, I’ll walk you through how to actually force SQL Server 2019 off your Windows system. We’ll cover everything, from stopping services to cleaning up leftover files, so your PC ends up clean and ready for a fresh install. No extra details, just the steps that work.
Preparation: Protect Data and Stop Services
Okay, first things first, don’t skip this. Back up all your databases. Seriously, you don’t want to regret it later.
Once that’s done, hit Windows Services (services.msc) and stop every SQL Server service you see. If anything’s running in the background, it can block the uninstall, so make sure it’s all stopped. Simple as that.
Standard vs. Advanced Removal Options
Okay, so here’s the deal: sometimes when you try to uninstall SQL Server 2019 from the Control Panel, it just refuses to go. Annoying, right?
If that happens, you can skip the normal method and go straight to the command prompt. Open it up and run something like:
setup.exe /ACTION=Uninstall /FEATURES=SQL /INSTANCENAME=MSSQLSERVER
This tells SQL Server to uninstall directly, without relying on the Windows interface. It usually works even when the usual way gets stuck, and it’s a lot quicker too. Basically, it cuts straight to the point and gets the job done.
Overcoming Stubborn Installations
If the command-line trick doesn’t do the job, don’t freak out. There’s a free tool from Microsoft called the Program Install and Uninstall troubleshooter that’s perfect for this situation.
Just download it, run it, pick the SQL Server components that are giving you trouble, and let it handle the removal. It’s usually the safest way to get rid of a stubborn SQL Server 2019 installation without breaking anything.
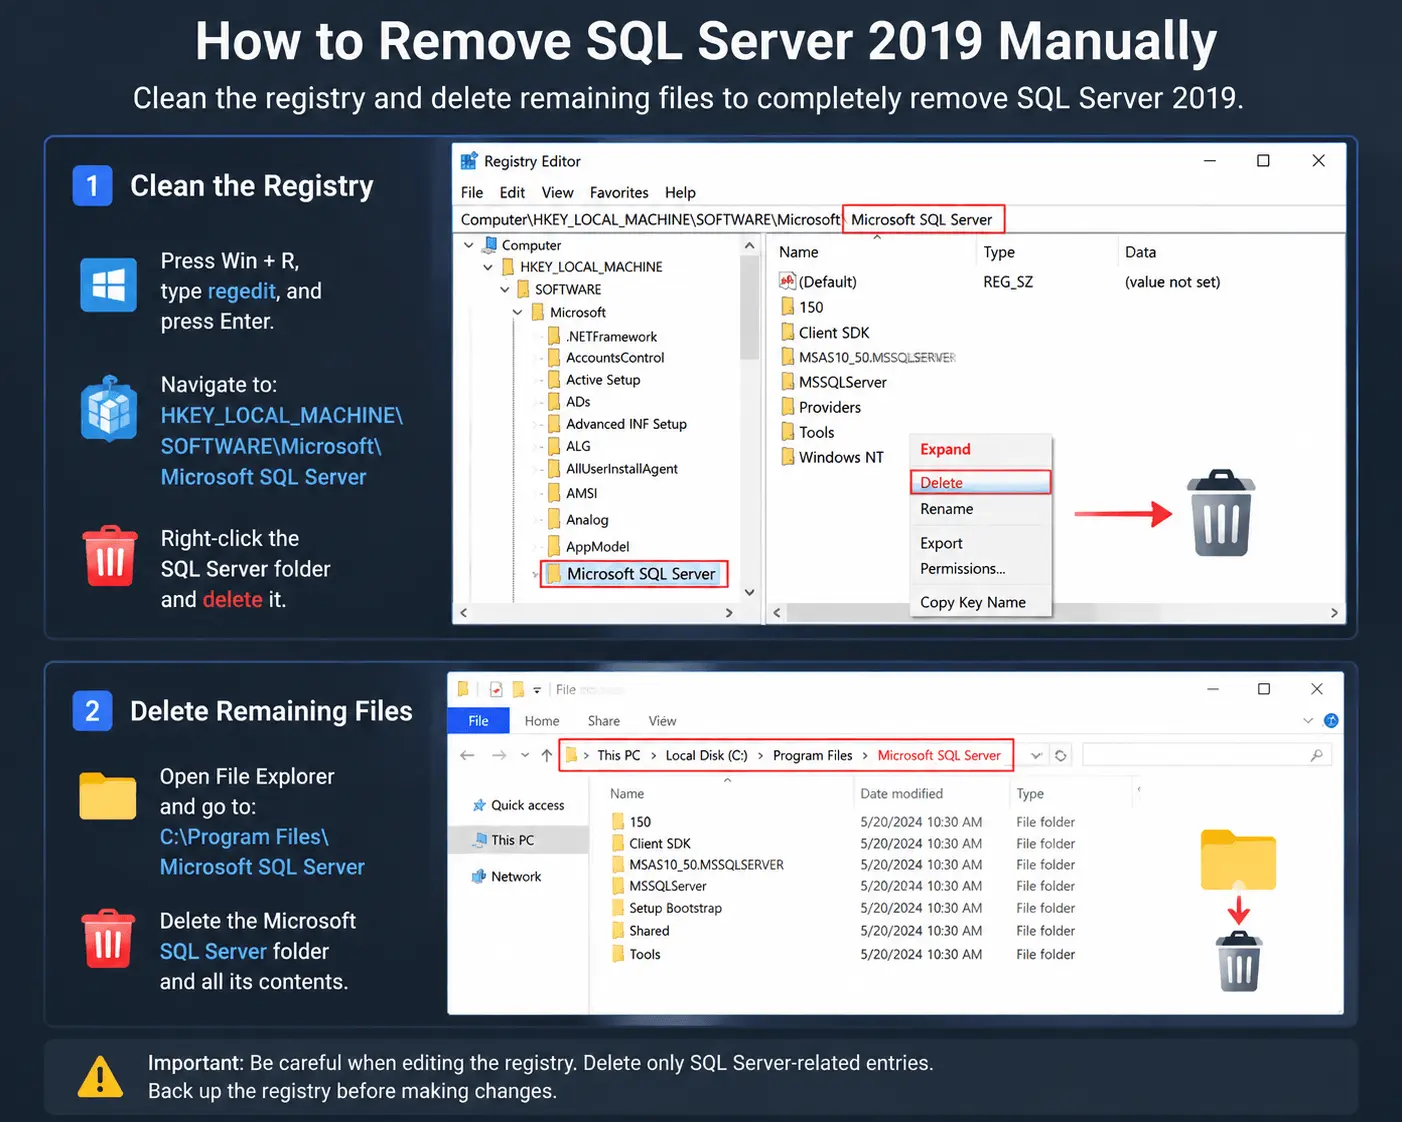
How to Remove SQL Server 2019 Manually
Sometimes the usual methods just don’t work. At this point, you’ll need to handle it yourself by cleaning out leftover files and registry entries.
Step 1: Clean the Registry
Open regedit and go to:
HKEY_LOCAL_MACHINE\SOFTWARE\Microsoft\Microsoft SQL Server
Take it slow here, deleting the wrong thing can mess up your system. Remove the SQL Server entries so nothing is left that could mess with a future install.
Step 2: Delete Remaining Files
With the registry cleaned and all SQL services stopped, you can safely delete the leftover program files. Go to:
C:\Program Files\Microsoft SQL Server
and then just remove whatever’s left. This cleans up anything the uninstall didn’t catch.
Don’t Forget the Extras
While you’re cleaning things up, make sure you check for any extras. Stuff like SQL Server Management Studio (SSMS) or Integration Services doesn’t always get removed automatically. You’ll need to uninstall each of these separately, so nothing gets left behind to cause trouble later.
Final Thoughts
Uninstalling SQL Server 2019 can be tricky sometimes. The Control Panel doesn’t always cut it. In cases like this, using the command line, the Microsoft troubleshooter, or doing a little manual cleanup is the way to go.
Take it slow, follow each step, and you’ll have a clean system ready for a fresh install. No extras, no surprises, just a fresh start.