Special Offer



How to Set a Static IP for a Linux Device



If you use your Linux VPS for anything that needs to be reached reliably, changing IP addresses can quickly become a problem. One common solution is to set a static IP for a Linux system. With a static IP, the address of your VPS does not change. You can reboot the server today, come back tomorrow, and connect to it using the same IP. This becomes especially useful when you have SSH access, firewall rules, or other services already set up around that address.
Before touching the network configuration, check the IP information your VPS provider gave you. TThis is one of those steps people tend to skip without even noticing, but it’s worth slowing down for. You cannot just pick a public IP and assign it to the server, even if that address appears to be unused. The IP has to be allocated to your VPS by the provider.
You will usually need a few details: the IP address itself, the gateway, the subnet, and the DNS servers. It is worth having all of them ready before you make any changes. A wrong gateway or subnet can leave the VPS without a working network connection, which is especially inconvenient when you are managing it remotely.
Before You Start
You will need:
- Root or sudo access
- SSH access to the Linux VPS
- The assigned IP address
- The subnet or CIDR prefix, such as /24
- The default gateway
- DNS resolver addresses
- Console access from your VPS provider, in case SSH disconnects
It is also smart to keep your current SSH session open while testing the new configuration.

Step 1: Check the Current Network Configuration
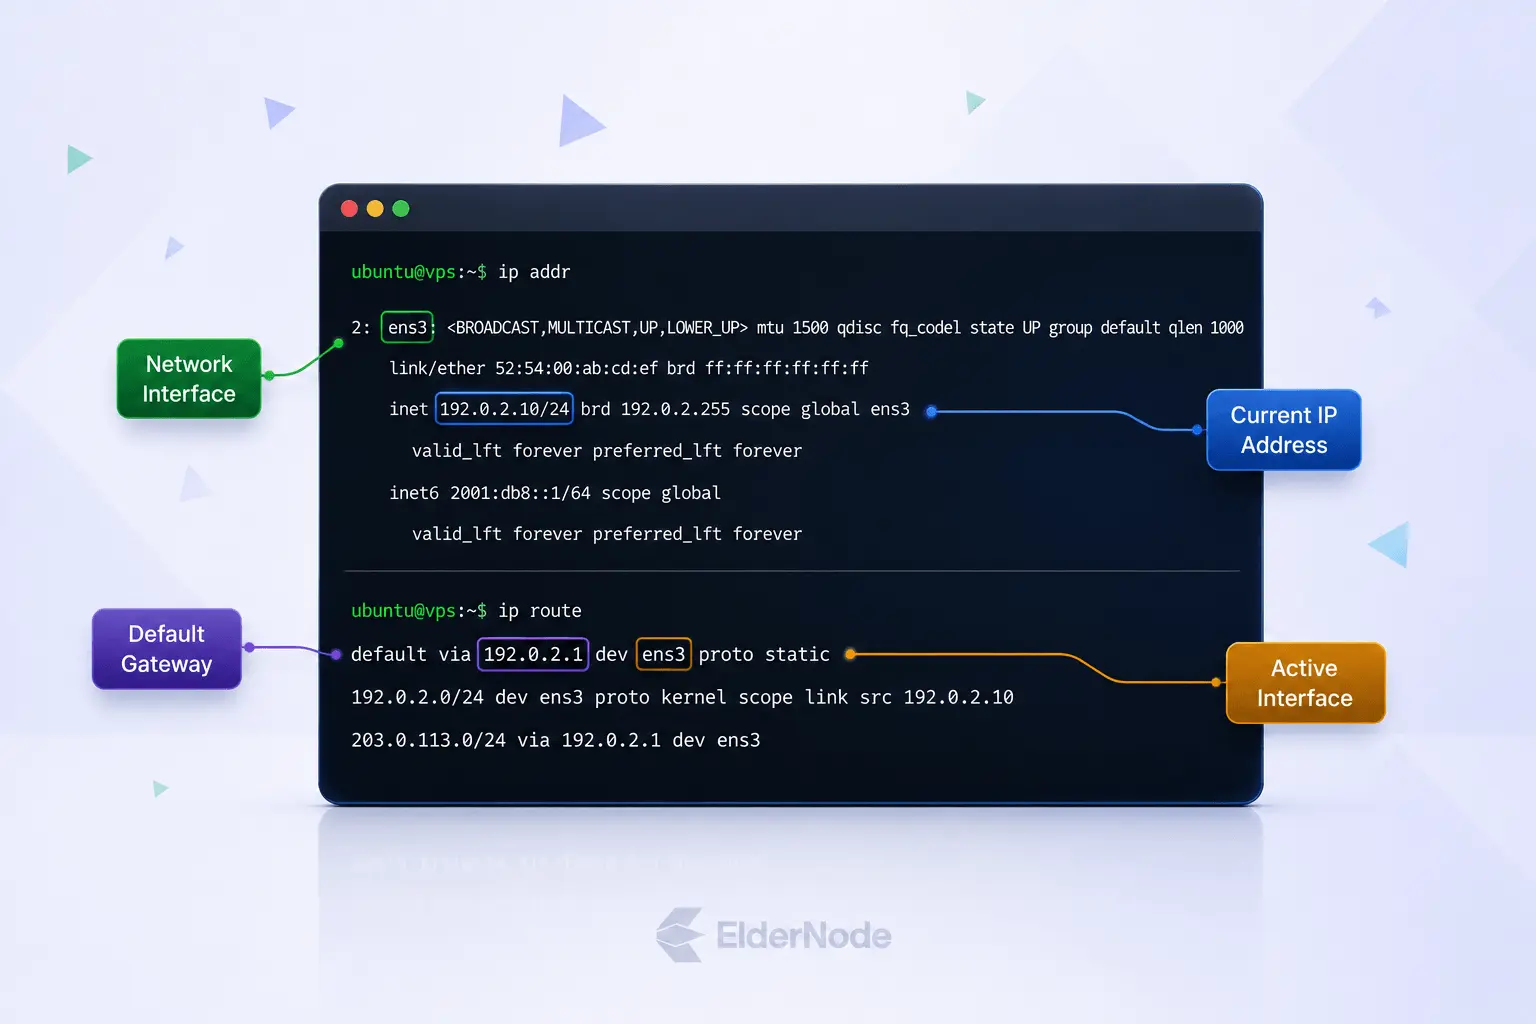
So the first thing we need to figure out is which network interface is actually doing the work on your machine. Open up your terminal and run:
ip addr
You’ll get a decent chunk of output, and somewhere in there you should see a name like eth0, ens3, ens18, or maybe enp1s0. Whatever comes up as your active interface, keep it in mind, or honestly just paste it into a notes file since future you will thank present you for that.
Once that’s sorted, the next thing to figure out is your default gateway. Run:
ip route
Look through the output for a line that starts with default via. That line gives you two things at once: the gateway’s IP address, and the interface it’s routed through. Write both of these down, because we’re going to need them later.
While you’ve got the terminal open anyway, it’s also worth checking your DNS setup, just so you know what’s going on before touching anything. You’ve got a couple of options here for how to go about it. You can run:
resolvectl status
which usually gives a nicer, more detailed breakdown if your system is using systemd-resolved, or if you’d rather keep it quick and simple:
cat /etc/resolv.conf
This will show you which DNS servers your machine is currently using, which is good to have on record before moving on to the next steps.
Step 2: Set a Static IP on Ubuntu with Netplan
If you’re on a fairly modern Ubuntu VPS, odds are it’s using Netplan under the hood. So let’s check what’s already there:
ls /etc/netplan/
Whatever file shows up, open it in your editor of choice. Nano’s the easy default if you don’t have a preference:
sudo nano /etc/netplan/01-netcfg.yaml
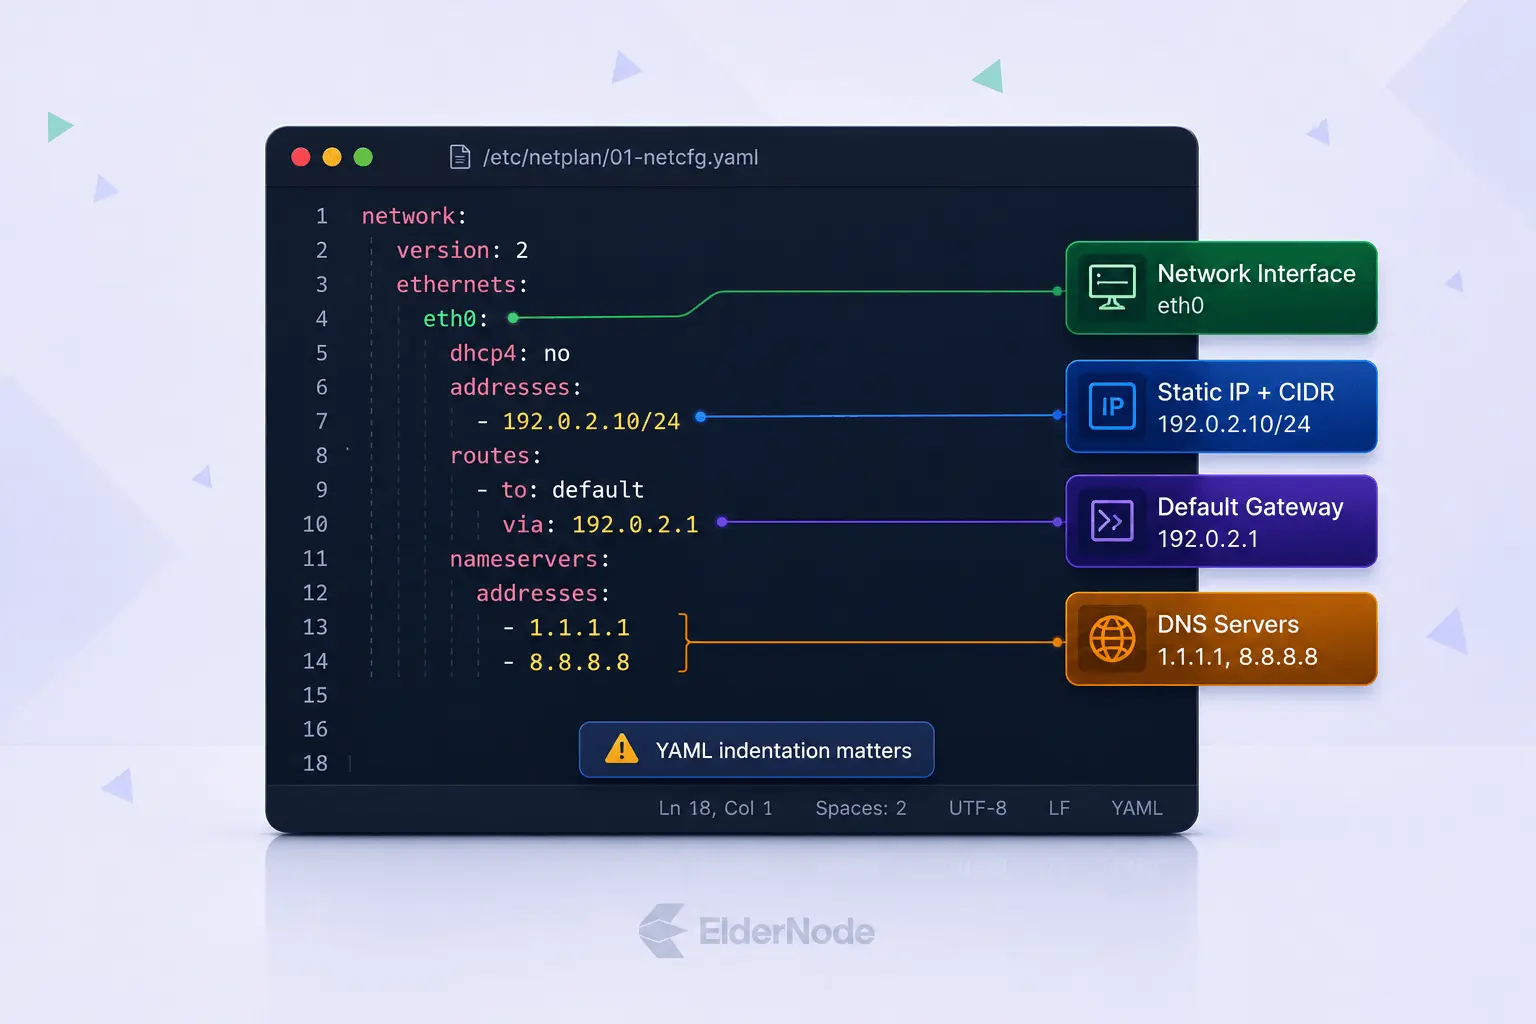
Don’t worry if the filename doesn’t match exactly, just use whatever you saw in the listing above. Now you’ll need to fill in your own details here: the interface name, IP address, gateway, and DNS servers, all based on whatever your VPS provider handed you. Once you’ve swapped in your own values, it should end up looking something like this:
network:
version: 2
ethernets:
eth0:
dhcp4: no
addresses:
- 192.0.2.10/24
routes:
- to: default
via: 192.0.2.1
nameservers:
addresses:
- 1.1.1.1
- 8.8.8.8
Save that, and before you do anything else, test it first:
sudo netplan try
This part matters more than people realize. The new configuration isn’t confirmed, Netplan can roll back the changes after the timeout, which gives you a way back if the network settings are wrong. If it looks right and everything’s still connected, go ahead and confirm the change.
If you’d rather skip the test and just push the config live right away, you can run:
sudo netplan apply
Step 3: Set a Static IP on Rocky Linux, AlmaLinux, CentOS, or RHEL
Most Red Hat based distros lean on NetworkManager instead of Netplan, so the commands look a bit different this time around. Start off by seeing what connections already exist on your system:
nmcli connection show
This’ll spit out a list of connection names, and you’ll want to spot the one tied to your main interface. Once you’ve got that name in hand, we can start updating it piece by piece.
First, set the IP address:
sudo nmcli connection modify "System eth0" ipv4.addresses 10.20.4.115/24
Then the gateway:
sudo nmcli connection modify "System eth0" ipv4.gateway 10.20.4.1
Now add your DNS servers:
sudo nmcli c mod "System eth0" ipv4.dns "9.9.9.9,149.112.112.112"
And finally, tell it to stop relying on DHCP and switch to manual instead:
sudo nmcli c mod "System eth0" ipv4.method "manual"
Once you’ve run through all of that, the changes won’t actually kick in until you bring the connection down and then back up again:
sudo nmcli connection down "System eth0"
sudo nmcli connection up "System eth0"
Quick heads up though, if your connection isn’t actually called “System eth0”, just go back through everything above and swap that in for whatever name popped up when you first ran nmcli connection show.
Step 4: Verify the Static IP Address
Let’s see if that new IP actually took hold:
ip addr show
Look for it under your interface. There it is? Good, that box is checked.
Now peek at the routing table:
ip route
The gateway should match what you typed in earlier.
Here’s where it gets interesting though, because none of this means anything until you actually test it. Fire off a ping:
ping -c 4 1.1.1.1
Replies coming back? That’s your server saying “yep, I can talk to the outside world.” But that’s only half the story, so throw this one at it too:
ping -c 4 example.com
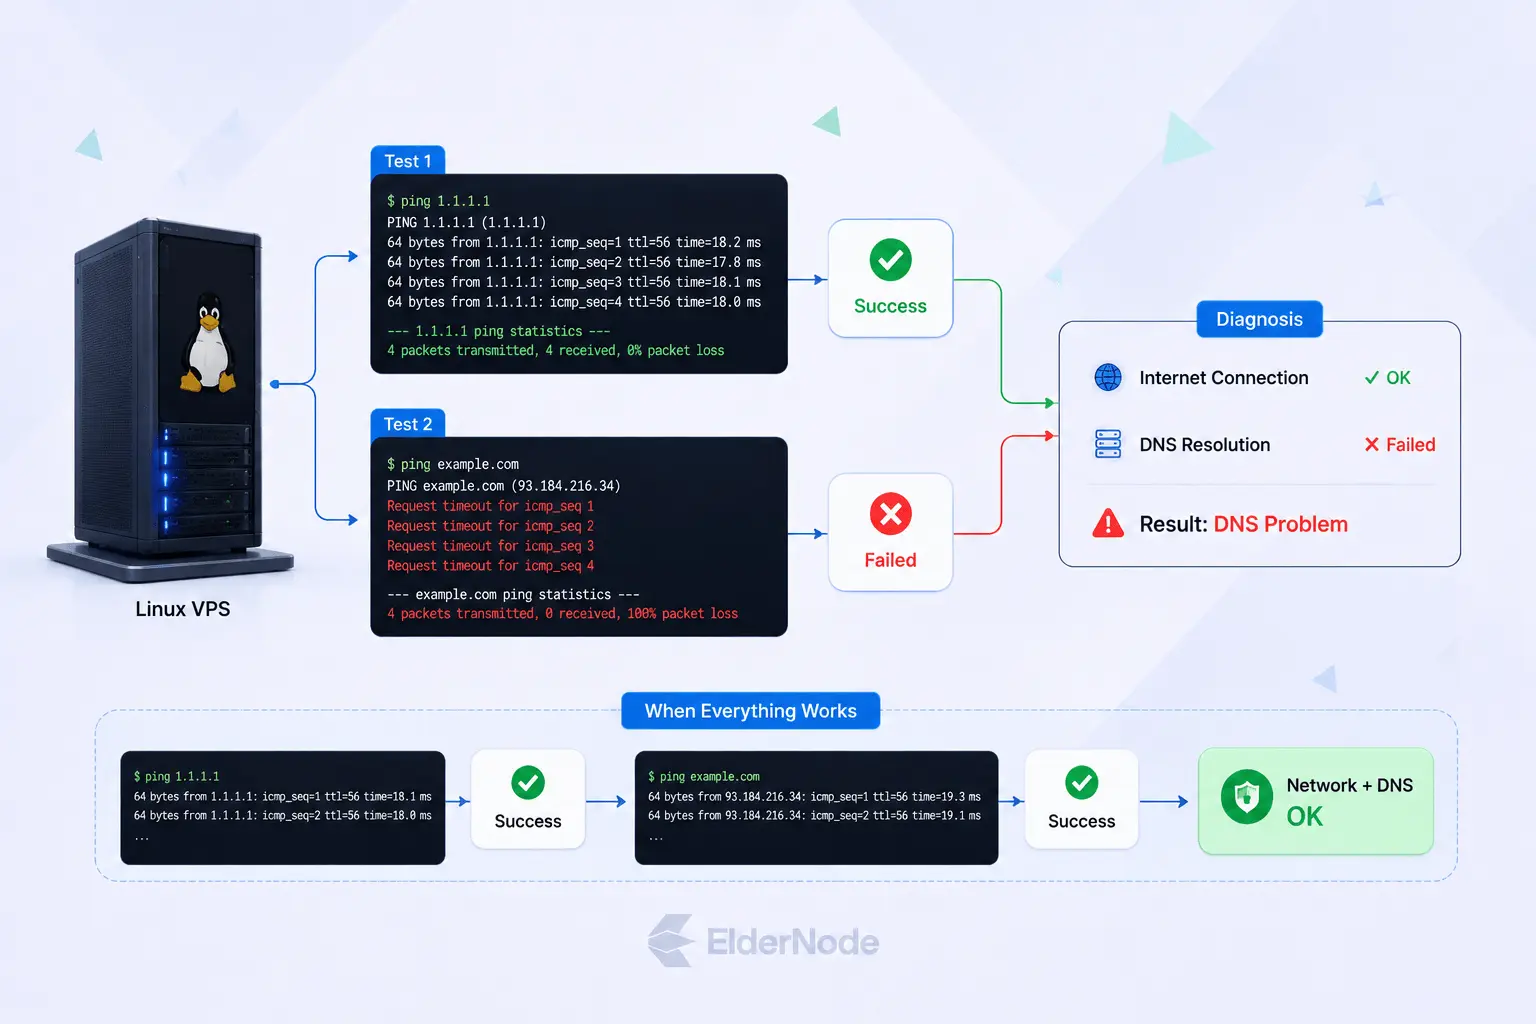
And here’s the tell. If the IP ping worked but this one just sits there and fails, you’ve basically caught your culprit red-handed, it’s DNS. Nothing wrong with your connection itself, your server just can’t turn a domain name into an address yet. Now you know exactly where to look next.
Troubleshooting Tips
If your static IP setup isn’t working the way it should, here are the usual suspects worth checking:
The IP address wasn’t actually assigned to you by your VPS provider. Always double check the address in your provider’s dashboard before typing it into a config file.
You edited the wrong interface. If you’ve got multiple interfaces or the name doesn’t match what showed up in your earlier checks, none of this will work no matter how correct everything else is.
The CIDR prefix is off. A wrong /24 versus /32 can completely break your networking, so it’s worth going back and confirming this against what your provider gave you.
The default gateway is missing or just plain wrong. Without a correct gateway, your server might have an IP but nowhere to actually send traffic.
Your YAML indentation is broken, if you’re on Netplan. YAML is brutally picky about spacing, and a single misplaced space can silently break the whole file.
A firewall rule is blocking SSH. Sometimes the network config itself is fine, but a firewall change somewhere else in the process locks you out.
Your VPS provider actually requires network changes through its own control panel. Some providers override anything you configure manually, so it’s worth checking their docs if nothing seems to stick.
And one last thing, seriously important: if SSH stops responding after any of this, don’t panic and don’t keep trying random fixes blind. Just hop into your provider’s web console and restore the previous configuration from there.
Final Check
The real test of whether any of this actually worked is seeing if your server still comes back correctly after a reboot. So let’s just do it:
sudo reboot
Give it a minute or two to come back online, then reconnect over SSH like you normally would. Once you’re back in, run:
ip addr
one more time. If you see that same static IP still sitting there, congrats, your Linux VPS is officially running on a static IP now. Everything’s set.