Special Offer





How to Install Suricata on Ubuntu




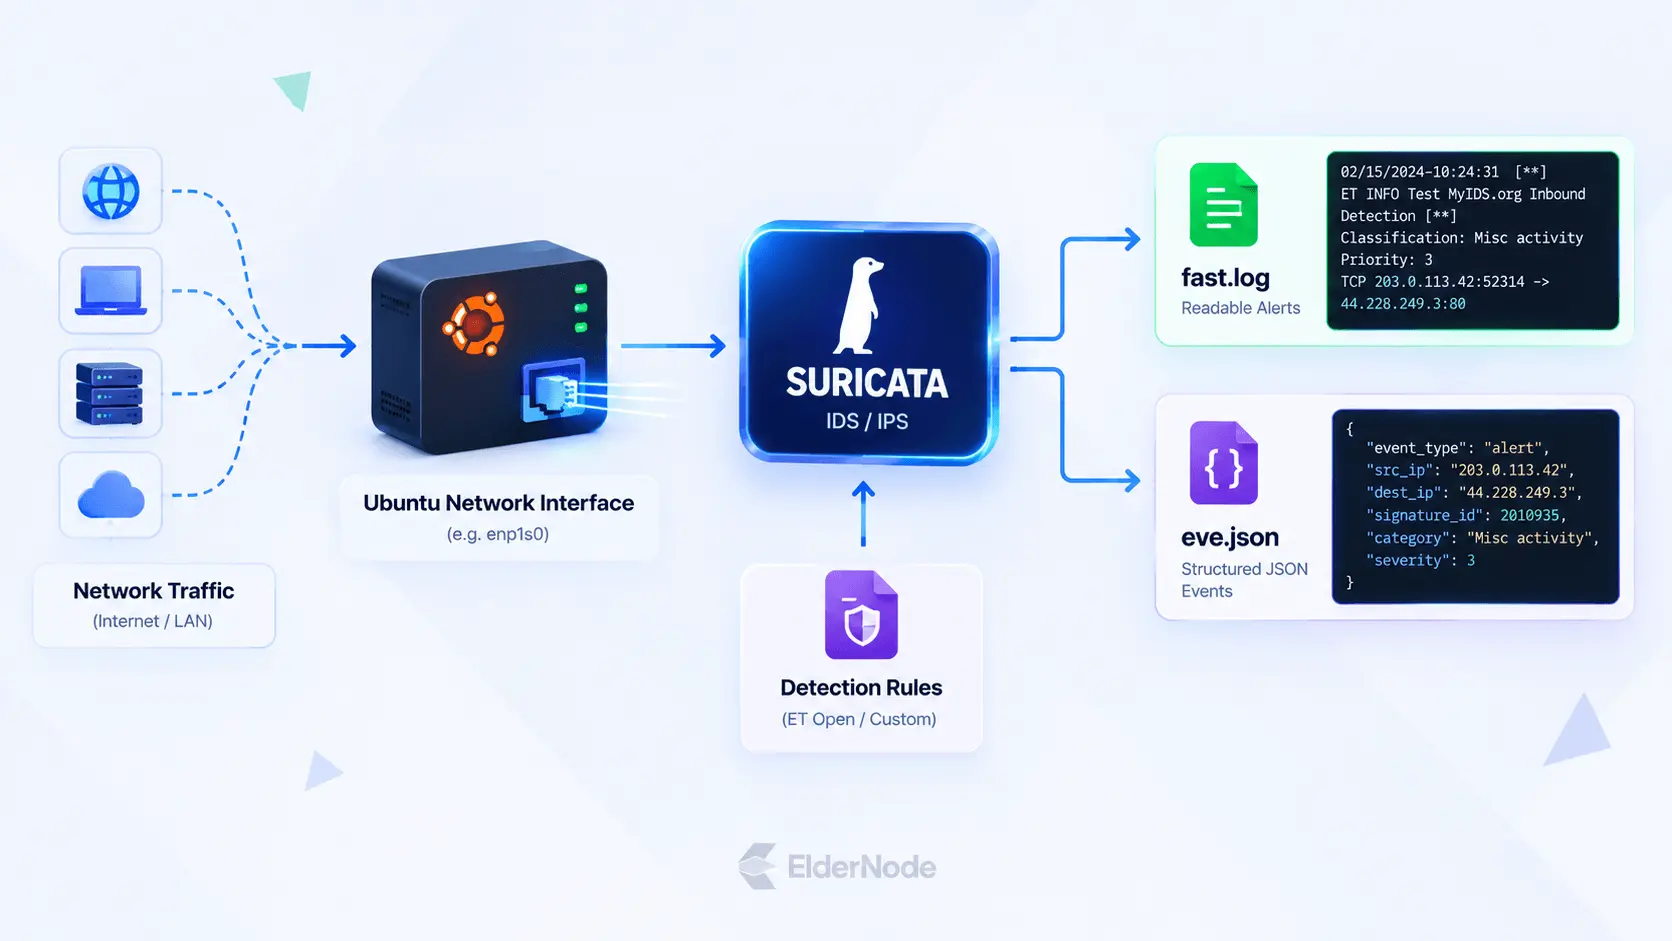
Suricata is an open-source engine for intrusion detection and prevention, and it watches network traffic for anything suspicious. In this guide, you’ll install it on Ubuntu from the official OISF PPA, set up the network interface, pull down the detection rules, and then check that alerts actually fire.
What do you need before you install Suricata?
You need an Ubuntu system with sudo, internet access, and the name of the network interface Suricata should monitor. For a normal workstation or server IDS setup, Suricata listens on an interface, loads rules, and writes events to log files so you can review suspicious traffic. OISF’s quickstart assumes a recent Ubuntu release and recommends the official PPA for the latest stable package, plus jq for reading EVE JSON output.
Install Suricata from the official PPA
The cleanest answer to “how to install Suricata on Ubuntu” is to use the maintained OISF package repository instead of compiling from source. This keeps installation, upgrades, and removal aligned with normal apt workflows. It also makes troubleshooting easier because configuration and service files land in expected package-managed locations.
Update Ubuntu and install repository tools
Start by refreshing package metadata and installing the tool Ubuntu uses to add PPAs:
sudo apt update
sudo apt install software-properties-common
This step avoids a common failure where add-apt-repository is not available on minimal server images.
Add the OISF stable Suricata PPA
Add the stable repository and refresh package metadata:
sudo add-apt-repository ppa:oisf/suricata-stable
sudo apt update
OISF documents ppa:oisf/suricata-stable as the Ubuntu PPA for installing the latest stable Suricata package
Install Suricata and jq
Install the engine and a JSON helper:
sudo apt install suricata jq
After installation, confirm the build and service state:
sudo suricata --build-info
sudo systemctl status suricata
Finish the interface and rule setup below, then restart Suricata.
Configure Suricata for your network interface
Suricata must know which interface to inspect. First, list interfaces and note the active one connected to the network you want to monitor:
ip addr
Look for names such as enp1s0, ens160, eth0, or wlan0. In most server deployments, choose the wired interface that sees the traffic you care about. Then edit the package configuration file:
sudo nano /etc/suricata/suricata.yaml
Find the af-packet section and set the interface name. A simple starting point looks like this:
af-packet:
- interface: enp1s0
cluster-id: 99
cluster-type: cluster_flow
defrag: yes
tpacket-v3: yes
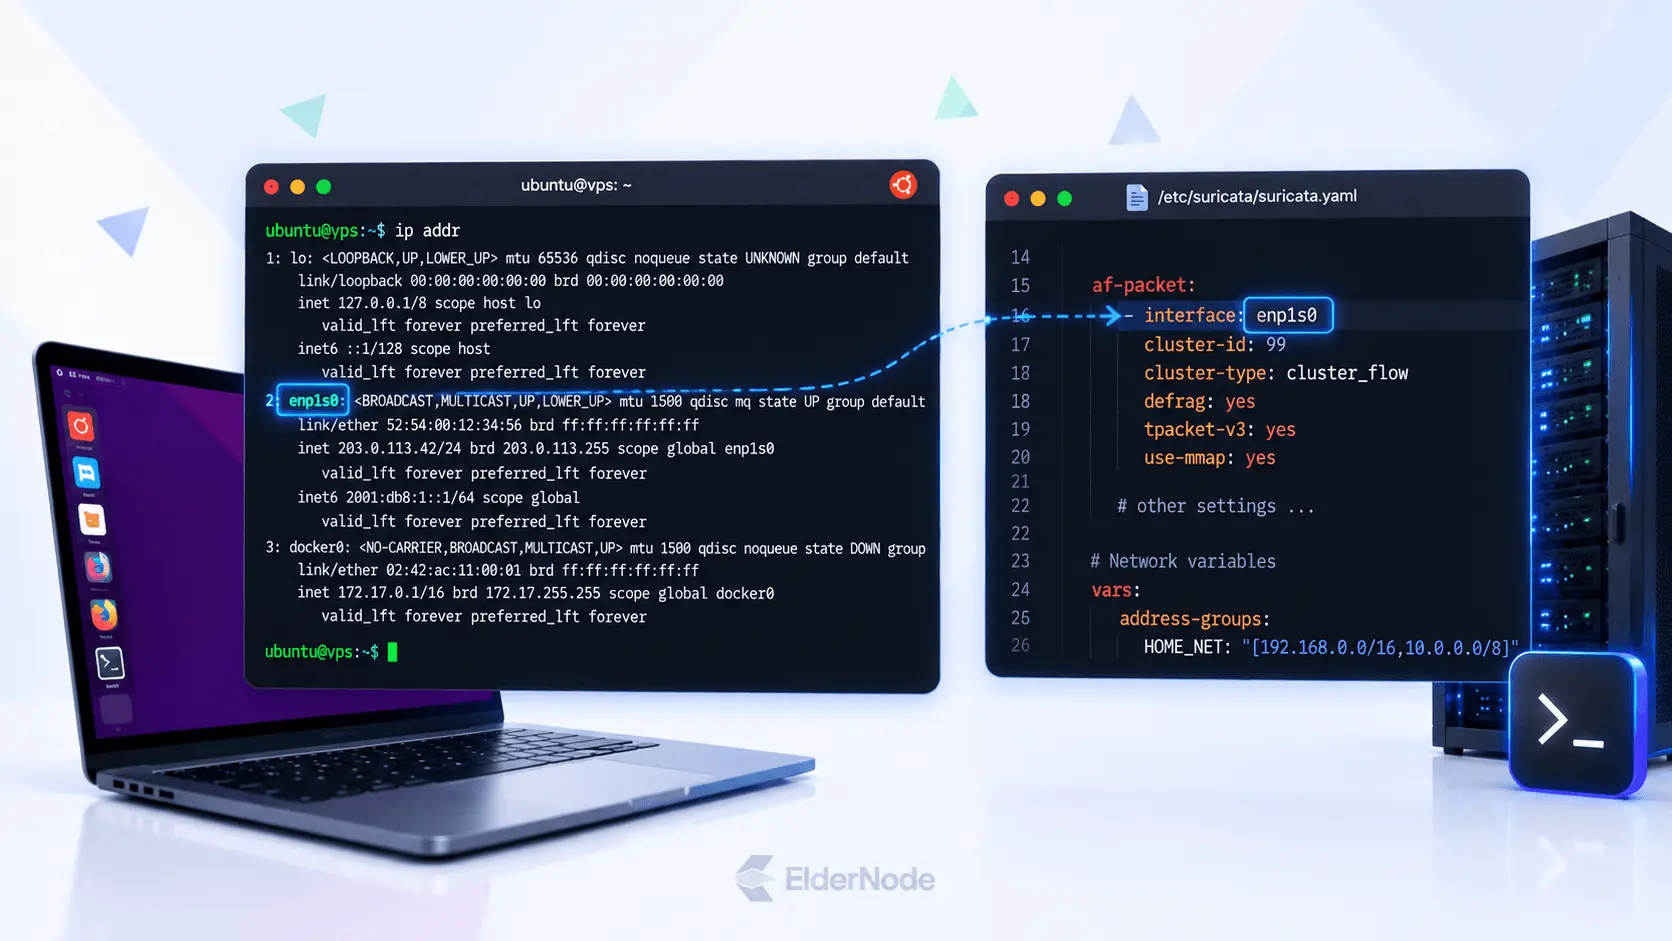
Also review HOME_NET; it should represent the local networks you want treated as internal. For many labs and small networks, the default private ranges are enough, but production networks often need a deliberate list of subnets.
Download rules and start monitoring
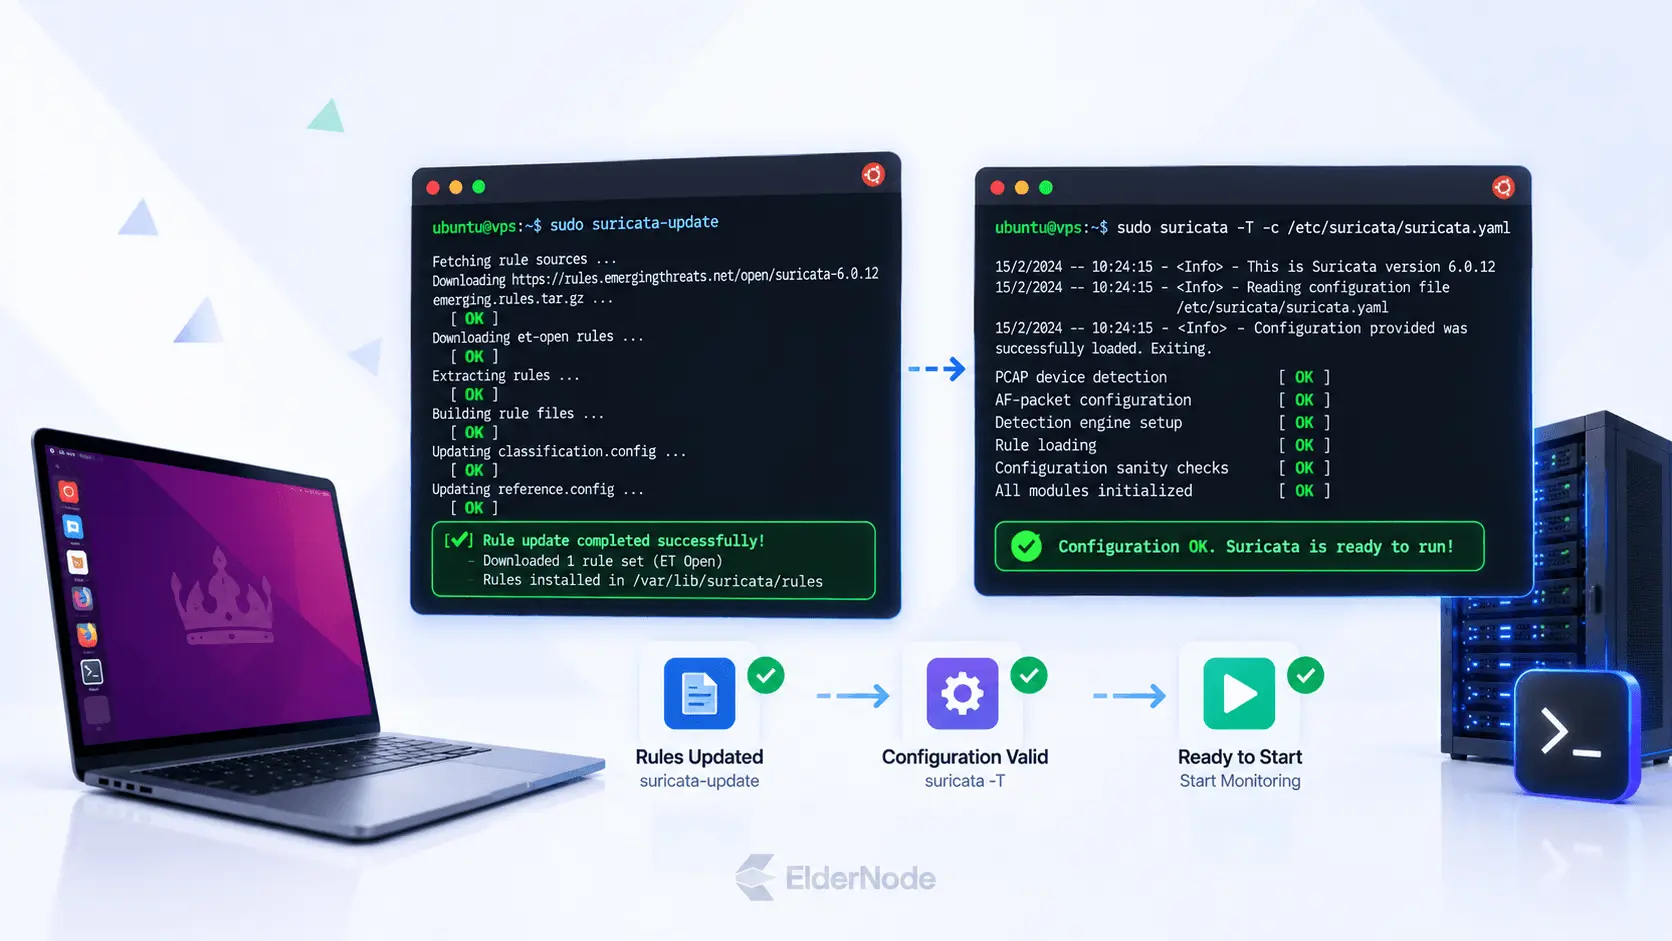
Suricata needs signatures, also called rules, before it can generate meaningful alerts. Run:
sudo suricata-update
By default, ‘suricata-update‘ downloads the ET Open ruleset and stores the rules under ‘/var/lib/suricata/rules’.
Before restarting Suricata, check the configuration for errors:
sudo suricata -T -c /etc/suricata/suricata.yaml
If the test reports an error, check the configuration file and fix the problem before restarting the service.
sudo systemctl restart suricata
sudo systemctl enable suricata
sudo systemctl status suricata
Check the main log to confirm the engine started:
sudo tail /var/log/suricata/suricata.log
You can also watch packet and decoder statistics:
sudo tail -f /var/log/suricata/stats.log
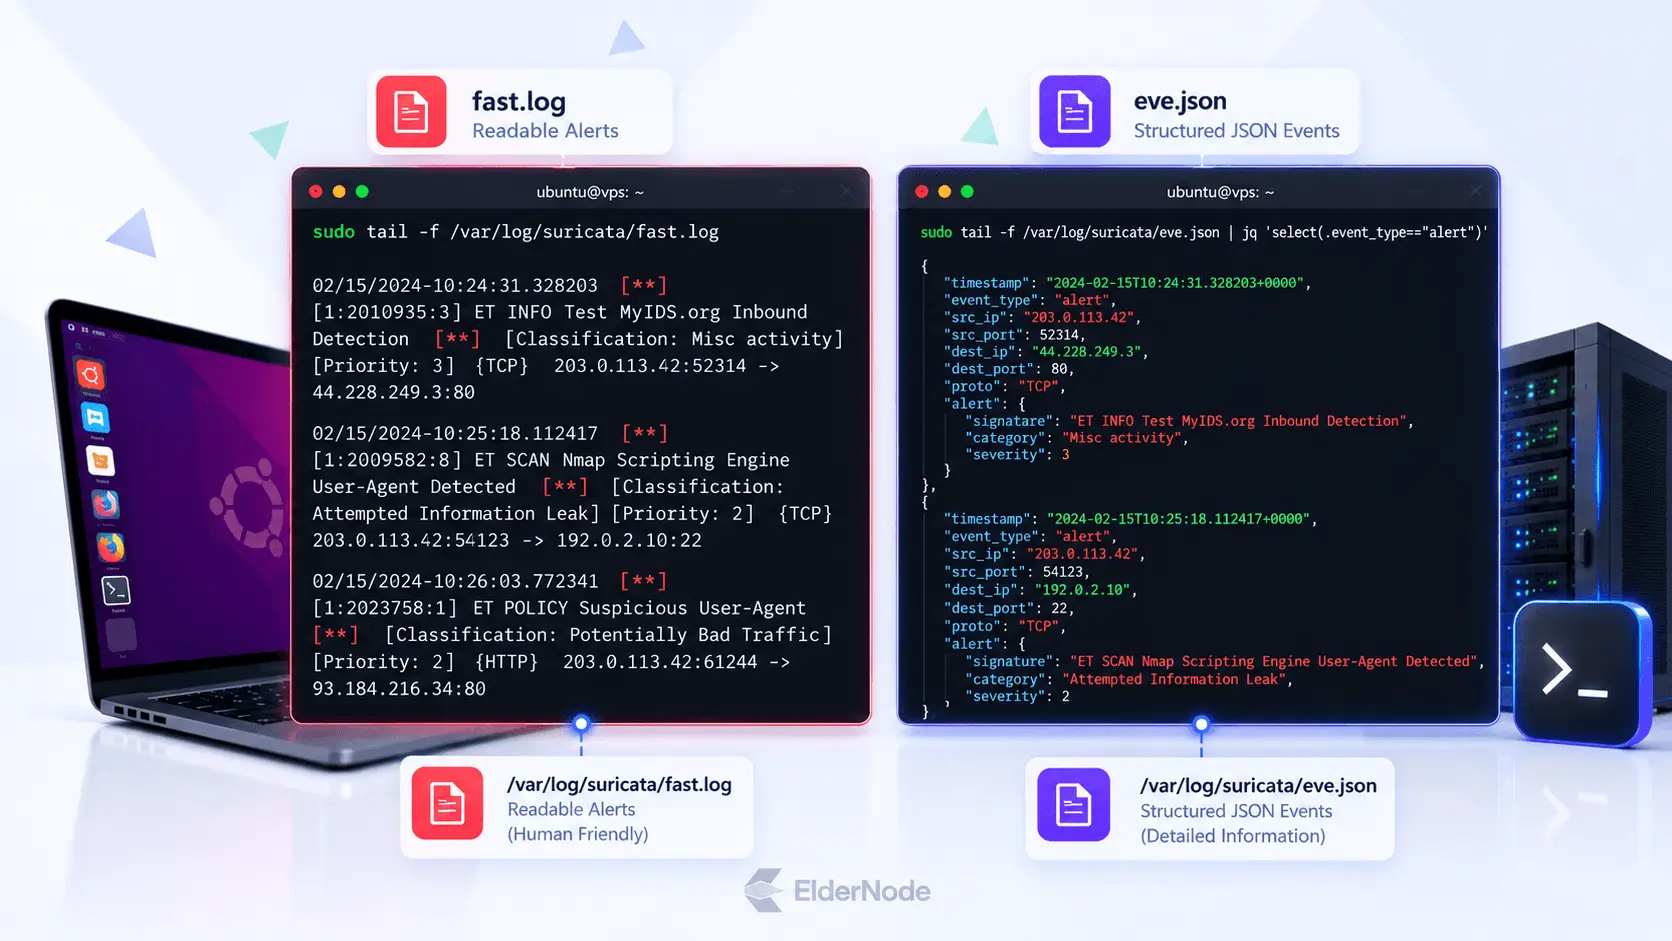
Suricata also writes structured events to ‘eve.json’, including alerts and network activity. To display only alert events, run:
sudo tail -f /var/log/suricata/eve.json | jq 'select(.event_type=="alert")'
Test that alerts are working
A running service is not enough; you should verify that Suricata can actually detect test traffic. The official quickstart uses an ET Open test signature and suggests watching fast.log while generating a test request. Open one terminal and run:
sudo tail -f /var/log/suricata/fast.log
In another terminal, trigger a safe IDS test request:
curl http://testmynids.org/uid/index.html
After running the test, look for an alert in fast.log. No alert? Check that Suricata is listening on the interface your test traffic uses. It’s also worth checking that the rules downloaded without any errors.

You can also check the service logs for errors:
sudo journalctl -u suricata -n 50 --no-pager
With this setup, Suricata watches for suspicious traffic and alerts you when it finds something. It won’t block any connections. To do that, you’ll need to configure it as an IPS.