Special Offer
 How to Mount an SMB Share in Linux Fstab
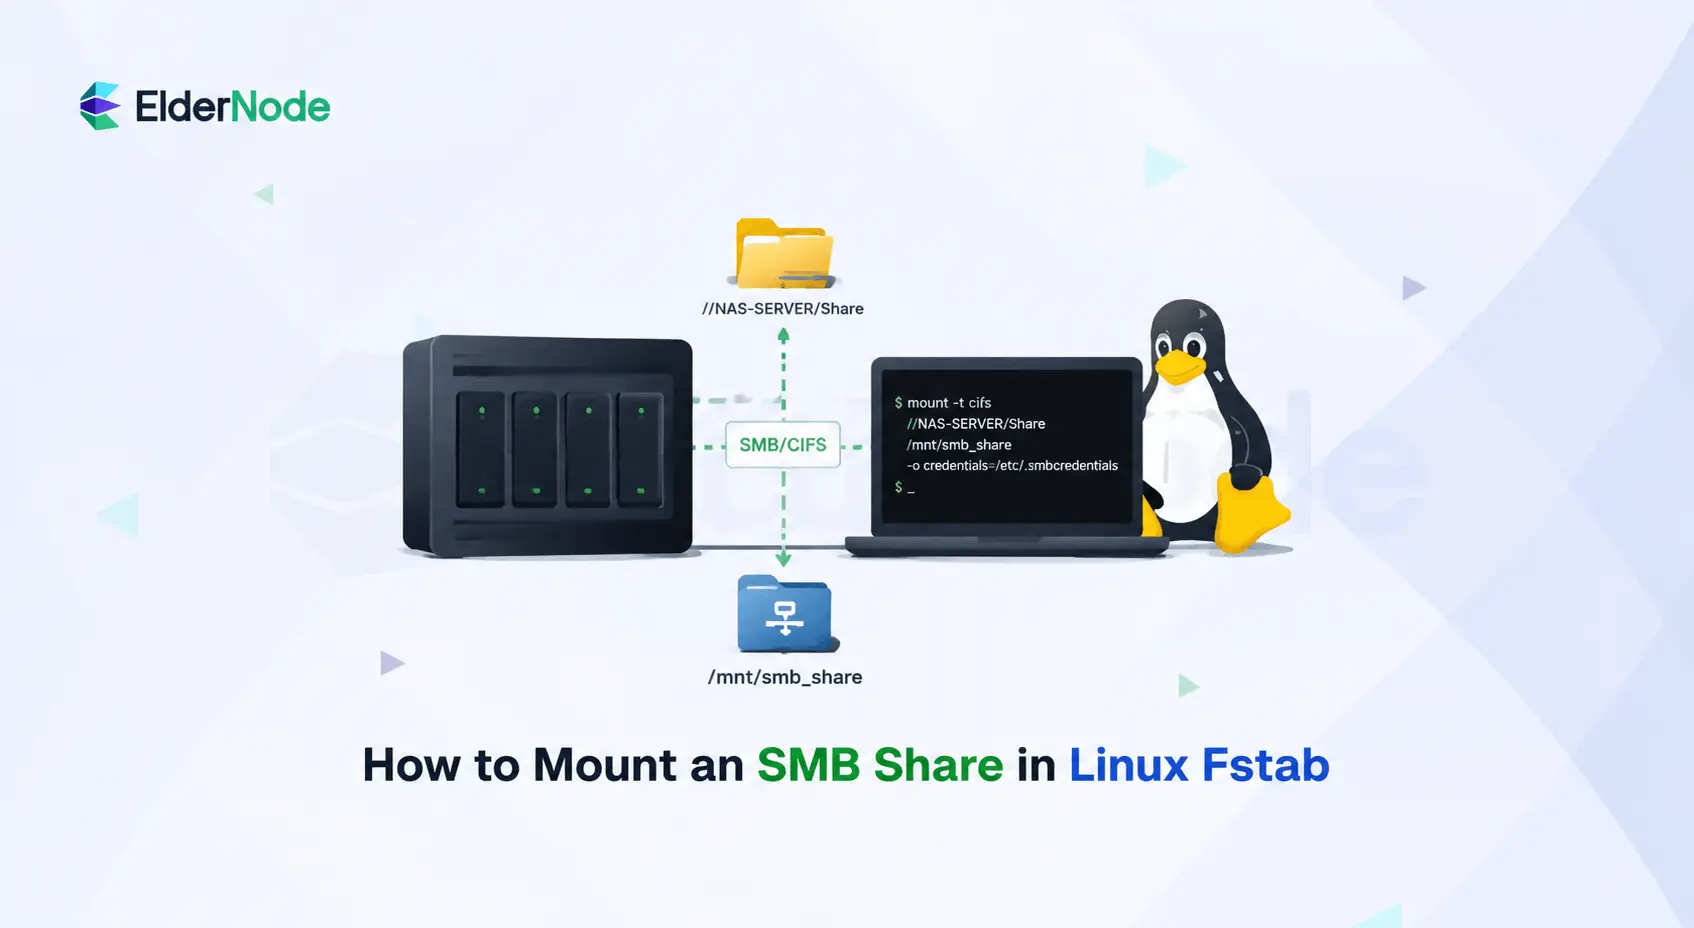


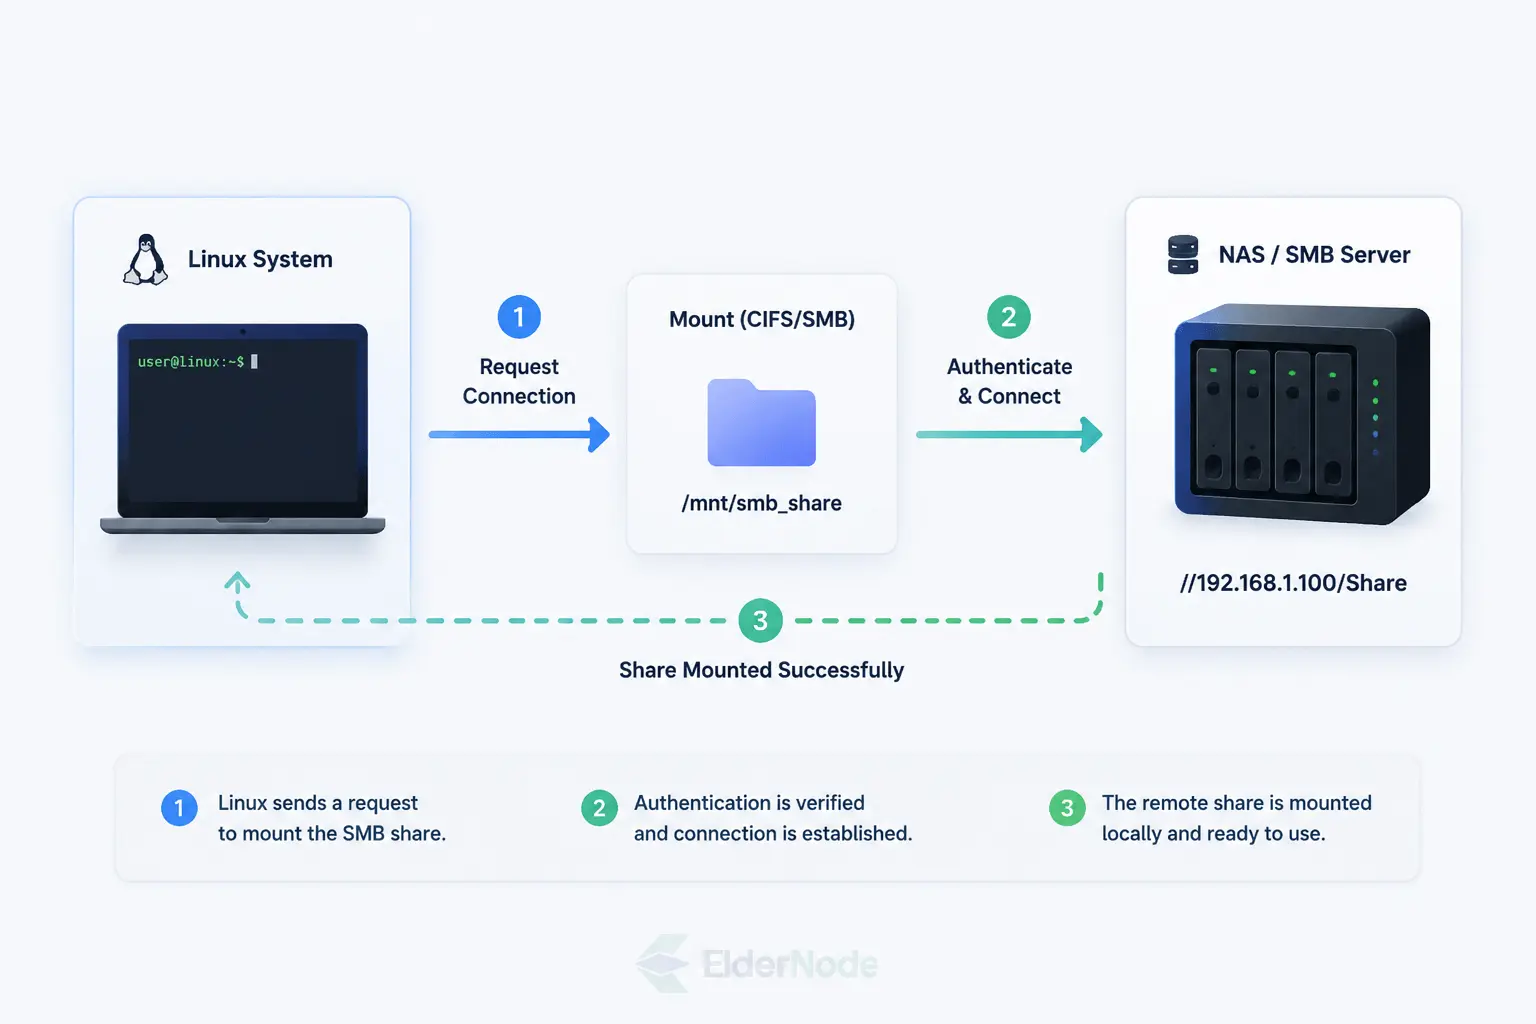
If you’ve ever worked with a hybrid network or a NAS, you probably know how annoying file sharing can get when things don’t just work. On Windows, it’s usually as easy as clicking a folder, but on Linux, you have to get your hands a little dirty to get the same result. One popular solution is to mount an SMB share in Linux fstab, which lets your remote server act like a local hard drive, and getting that stable connection is the key to a stress-free workflow.
The biggest headache, though, is what happens when you reboot. Nobody wants to sit there manually remounting drives every time they turn on their machine.
That’s why you need to set this up in fstab. It’s the “set it and forget it” way to make sure your network storage is always there, ready to go, the second you log in. I’m going to show you how to get this configured properly, including how to handle your credentials safely, so you can stop worrying about connection issues and just get back to work.
Understanding the Basics: SMB vs. CIFS
Before we start messing around with terminal commands, it’s worth clearing up a little confusion you’ll run into. People love to swap the terms “SMB” and “CIFS” like they’re the same thing, but they aren’t exactly identical.
SMB is the modern file-sharing protocol used by Windows systems, while CIFS is an older implementation name still used in Linux tools for compatibility.
Essential Tools: Preparing Your Linux System
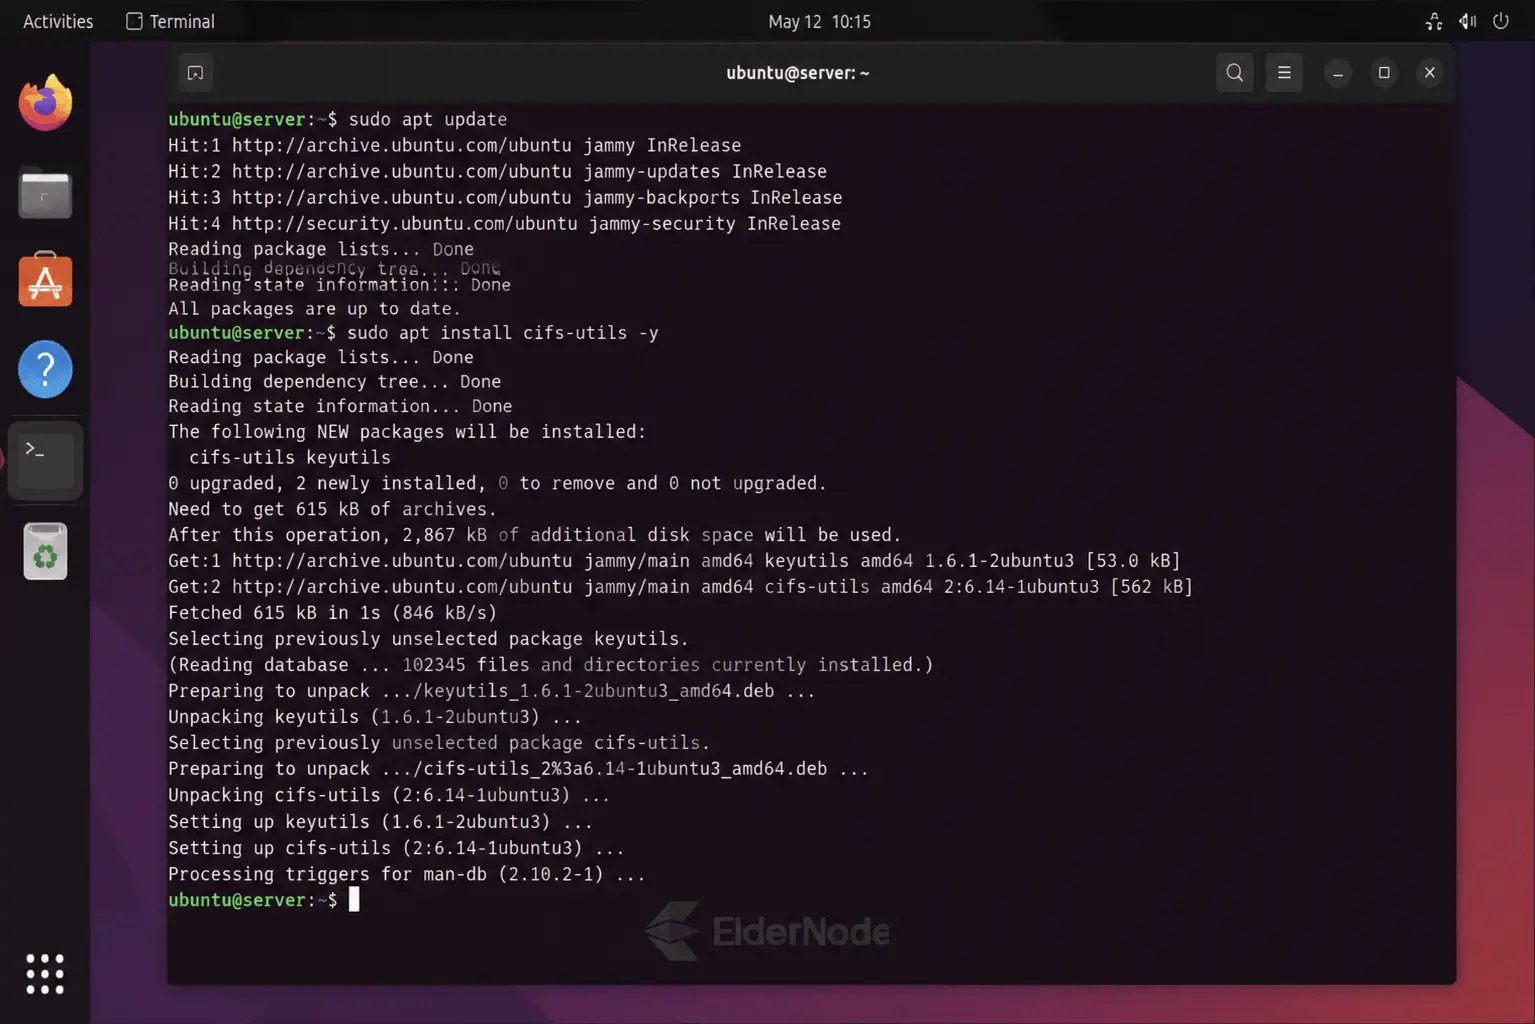
Before we start fiddling with configuration files, we need to make sure your Linux system is actually set up to talk to your network storage. It’s a quick first step, you just need a small package called cifs-utils.
Go ahead and open your terminal and run the command that matches your setup:
For Ubuntu or Debian systems, you can install the required package by running:
sudo apt update -y
sudo apt install cifs-utils -y
CentOS/RHEL:
sudo yum install cifs-utils
Arch Linux:
sudo pacman -S cifs-utils
Once that’s done, you might be wondering why there are two ways to do this: smbclient or mount.cifs.
It’s great if you just want to quickly hop into a server to grab a file and jump back out, but it’s a bit clunky for anything else.
If you want your network folders to just “be there”, like they’re actually part of your computer, then mount.cifs is the way to go. It plugs the remote folder right into your file system. After that, your apps and scripts treat it just like any other local folder. You won’t have to keep “getting” or “putting” files.
👉 This setup is commonly used on Linux VPS environments
Step 1: Mapping Network Drive via Linux Command Line
Before we go to the permanent setup, let’s just quickly test it to make sure everything works. This helps identify configuration or network issues before setting up persistent mounts., rather than later when we’re trying to get things to mount automatically at boot.
First, we need to create a “landing spot”, basically just an empty folder where your network files will appear on your computer:
sudo mkdir -p /mnt/network_share
Now, let’s try a manual connection to see if it sticks.
sudo mount -t cifs //server_address/share_name /mnt/network_share -o username=your_user,password=your_password
If you hit Enter and it doesn’t complain, you’re golden! You can go ahead and open up that folder, and you should see all your files sitting right there.
Once you’ve confirmed that everything is working, just unmount the drive to clean up:
sudo umount /mnt/network_share
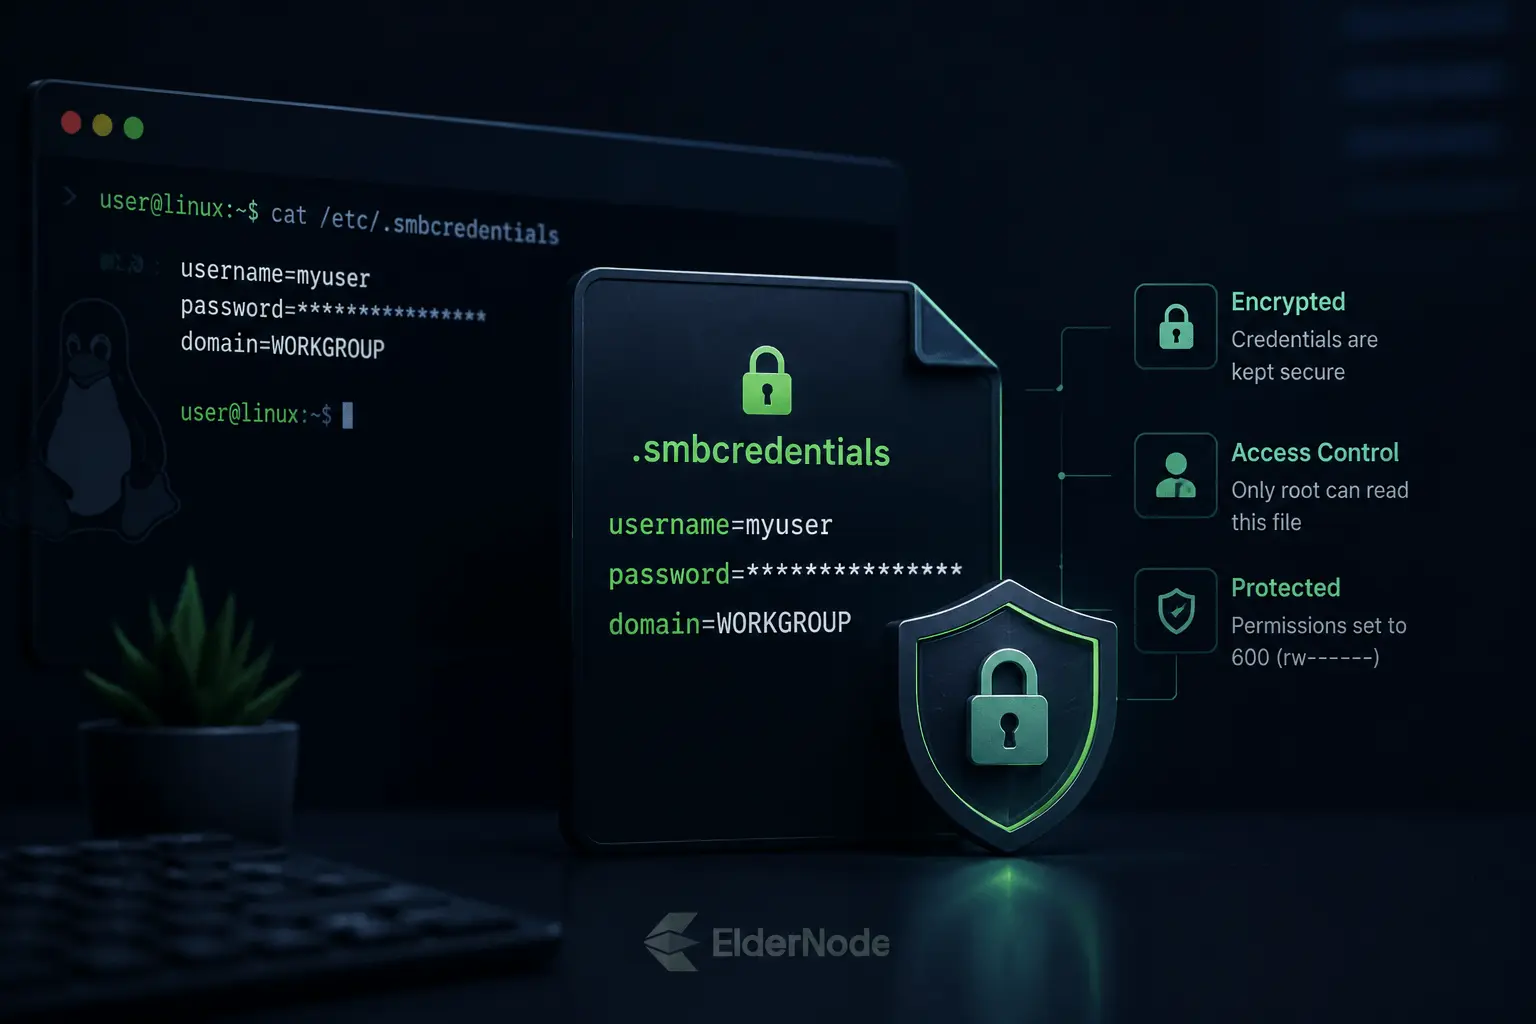
Step 2: Creating a Secure Credentials File
Leaving your password in plain text inside fstab is like leaving your house keys outside, anyone who sees it can get into your network. It’s risky, but we can fix it in a couple of minutes.
Here’s the move:
Create the hidden vault: We’ll use a basic editor to create a secret file called .smbcredentials inside the /etc/ folder:
sudo nano /etc/.smbcredentials
Tuck the info inside: Once the editor opens, just type in your details following this simple layout:
username=your_username
password=your_password
domain=your_domain
(If you aren’t using an Active Directory domain, you can just leave the domain line out.) When you’re finished, just hit Ctrl+O to save and Ctrl+X to close it.
Seal the vault shut: This is the most important step. We need to make sure no one can “accidentally” go snooping through your password file, or even see it, for that matter. It’s just about being smart and keeping those details strictly between you and your machine. We’ll use the chmod command to lock it down tight so only the root user can open it:
sudo chmod 600 /etc/.smbcredentials
By doing it this way, you’ve kept your sensitive info safely behind closed doors, while still making sure your system has exactly what it needs to handle the heavy lifting in the background.
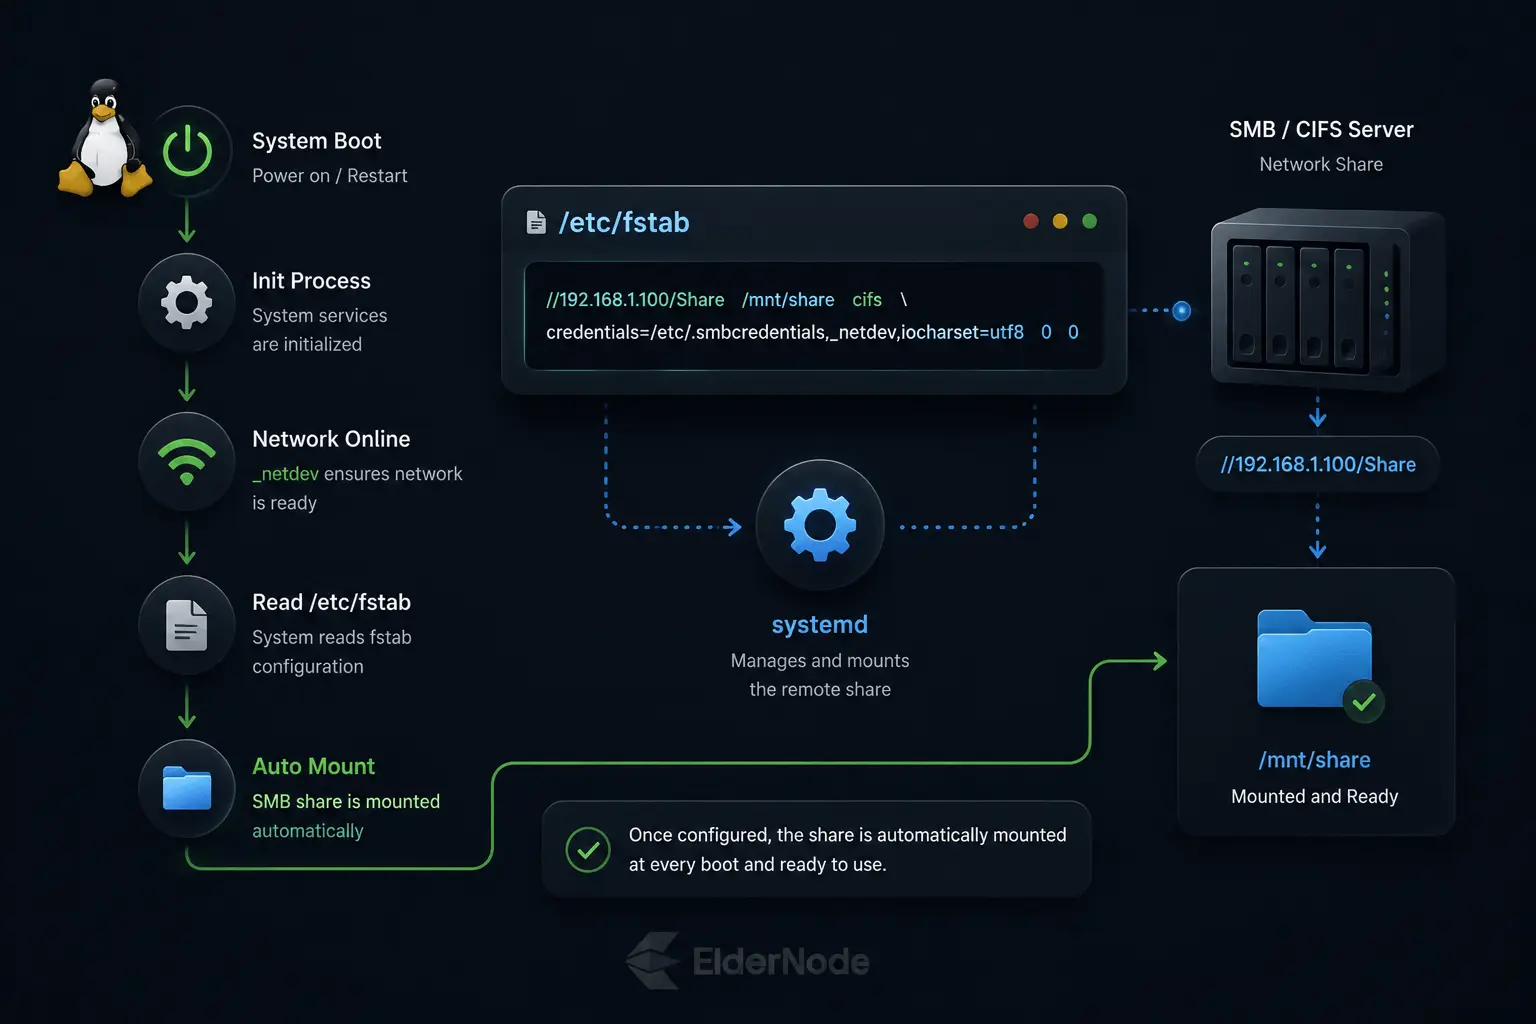
Step 3: How to Mount an SMB Share in Linux fstab
Anything you add there becomes an instruction your system follows automatically as soon as it boots up. By adding one simple line, we’re telling it:
Here is how to handle it
First, open up that list:
sudo nano /etc/fstab
Go all the way to the bottom, don’t worry about whatever is already there, and just paste this line on a fresh new row:
//server_address/share_name /mnt/network_share cifs credentials=/etc/.smbcredentials,iocharset=utf8,noperm 0 0
Just so you know what’s happening
The first part is just the “address” of your files on the network.
The second part is where you want them to show up on your computer.
The credentials part tells your system to use that saved file instead of prompting you for a password every time.
The noperm bit? That’s just my favorite trick, it stops Linux from getting confused by Windows file permissions, which saves us a massive headache later on.
Once that’s in, hit Ctrl+O to save and Ctrl+X to close it out.
That’s it. From now on, your computer will handle the heavy lifting for you while it boots up.
Step 4: Advanced Options and Permissions tuning
If you’ve noticed that you can’t edit or delete your files because they seem “owned” by root, it’s just a quick permissions fix. Let’s also give the connection a performance boost while we’re at it.
1. Grab your ID
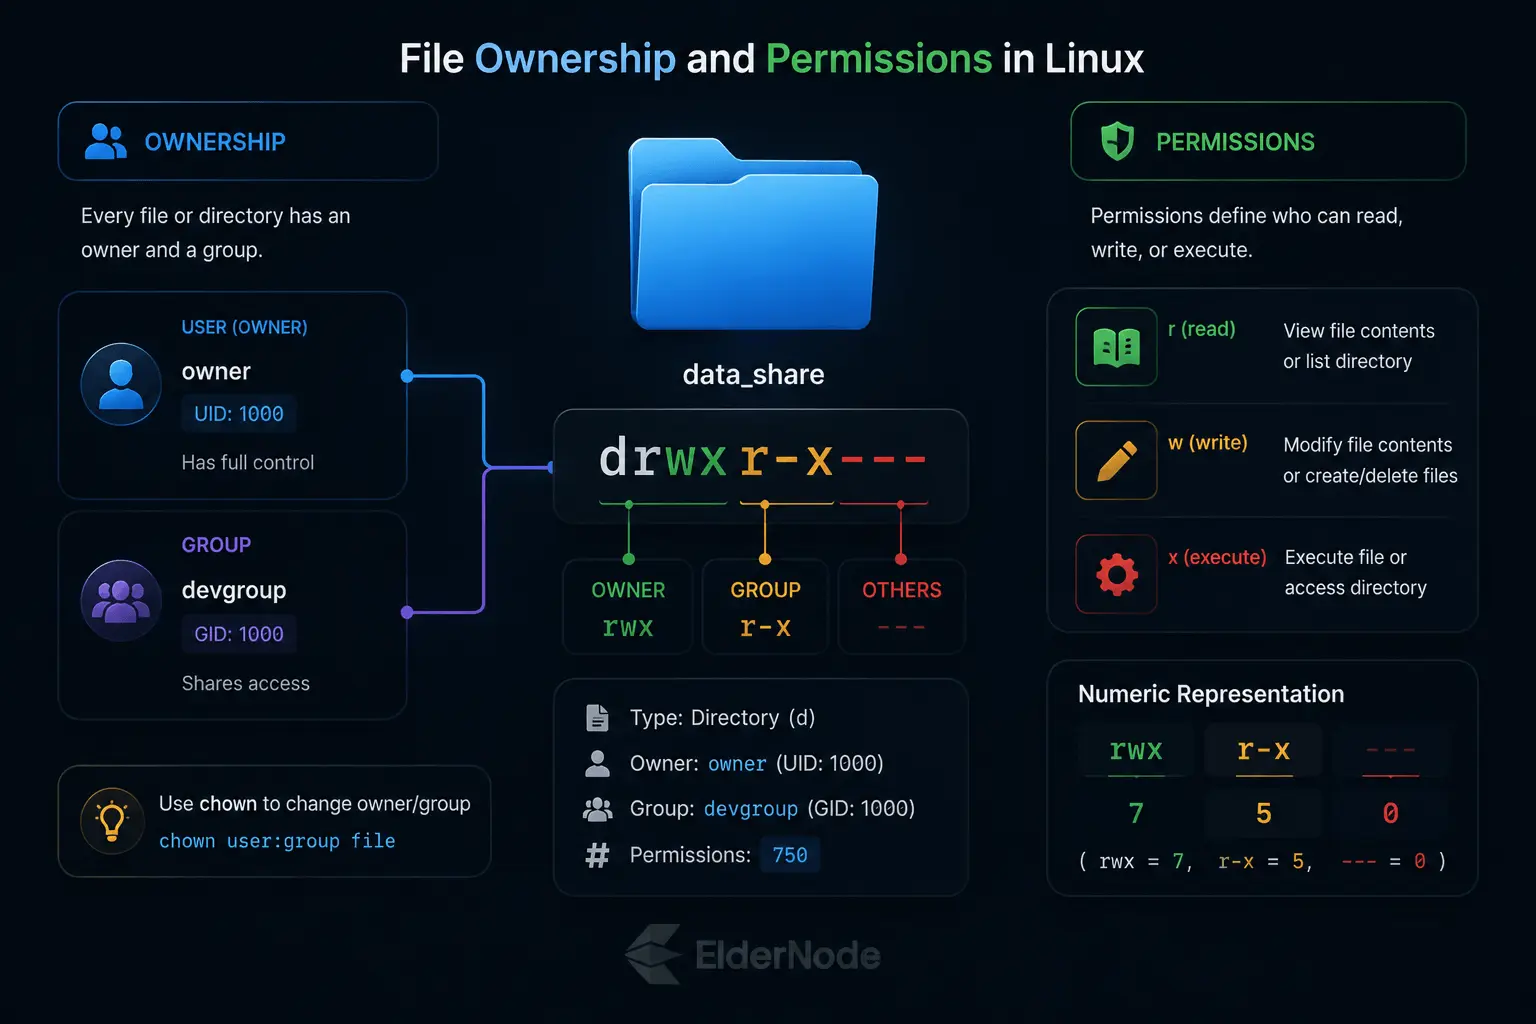
Type id in your terminal and look for your uid and gid. They’re usually 1000, just keep those numbers handy.
2. Update your settings
Open the file again with sudo nano /etc/fstab and replace that previous line with this polished version:
//192.168.1.100/SharedFolder /mnt/network_share cifs credentials=/etc/.smbcredentials,uid=1000,gid=1000,vers=3.0,cache=strict,rsize=1048576,wsize=1048576,iocharset=utf8 0 0
(Just make sure to swap 1000 with your actual ID numbers if they’re different.)
3. The quick test
Save your changes and run:
sudo mount -a
Troubleshooting and Modern Alternatives
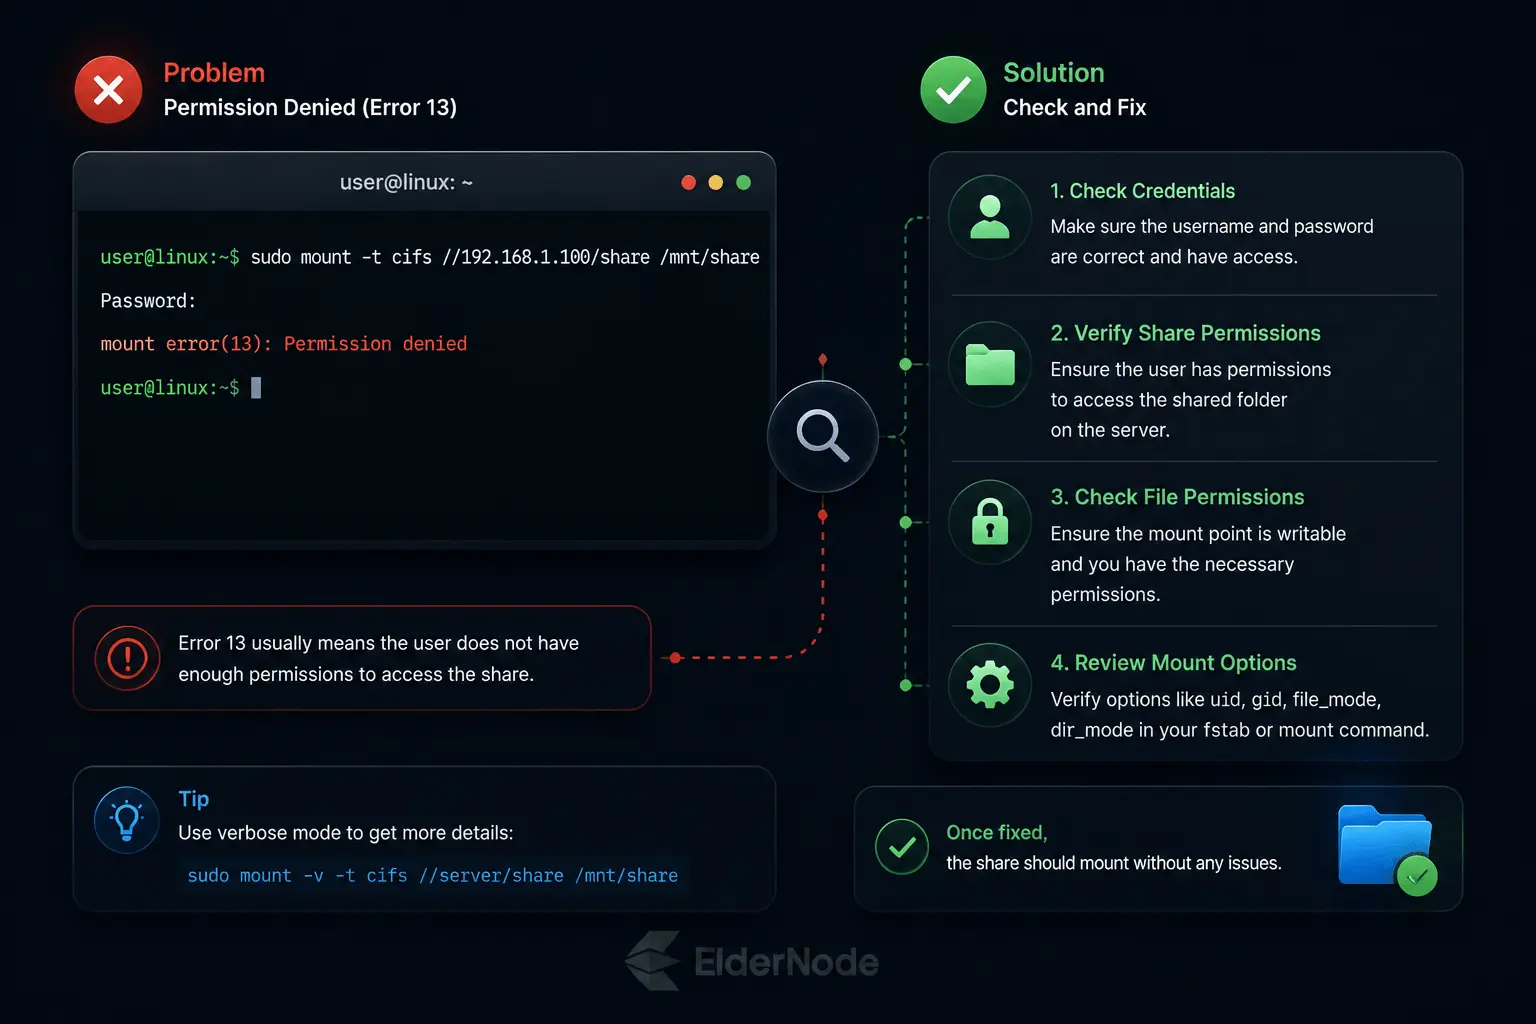
ven when everything is set up perfectly, network stuff can sometimes be a bit moody. If you run into a “Permission denied” error (Error 13), This is usually caused by a misconfigured credentials file or incorrect domain entry. Double-check for extra spaces after your password, and if you’re on a work network, make sure you’ve included your domain=.
A note on reliability
The classic fstab approach is great, but sometimes your computer tries to mount the folder before your internet is fully awake, which causes the connection to fail on boot.
The easy fix: You can just add _netdev to your line in fstab. It tells the system, “Hey, wait until the network is actually ready before you try to connect.”
The “Pro” way: If you want to get really fancy, modern Linux systems use systemd mount units. It’s a bit more work, but it lets you set strict rules to make sure the connection only triggers once the network is 100% stable.
For most people, though, that _netdev trick is all you’ll ever need.
Final Thoughts
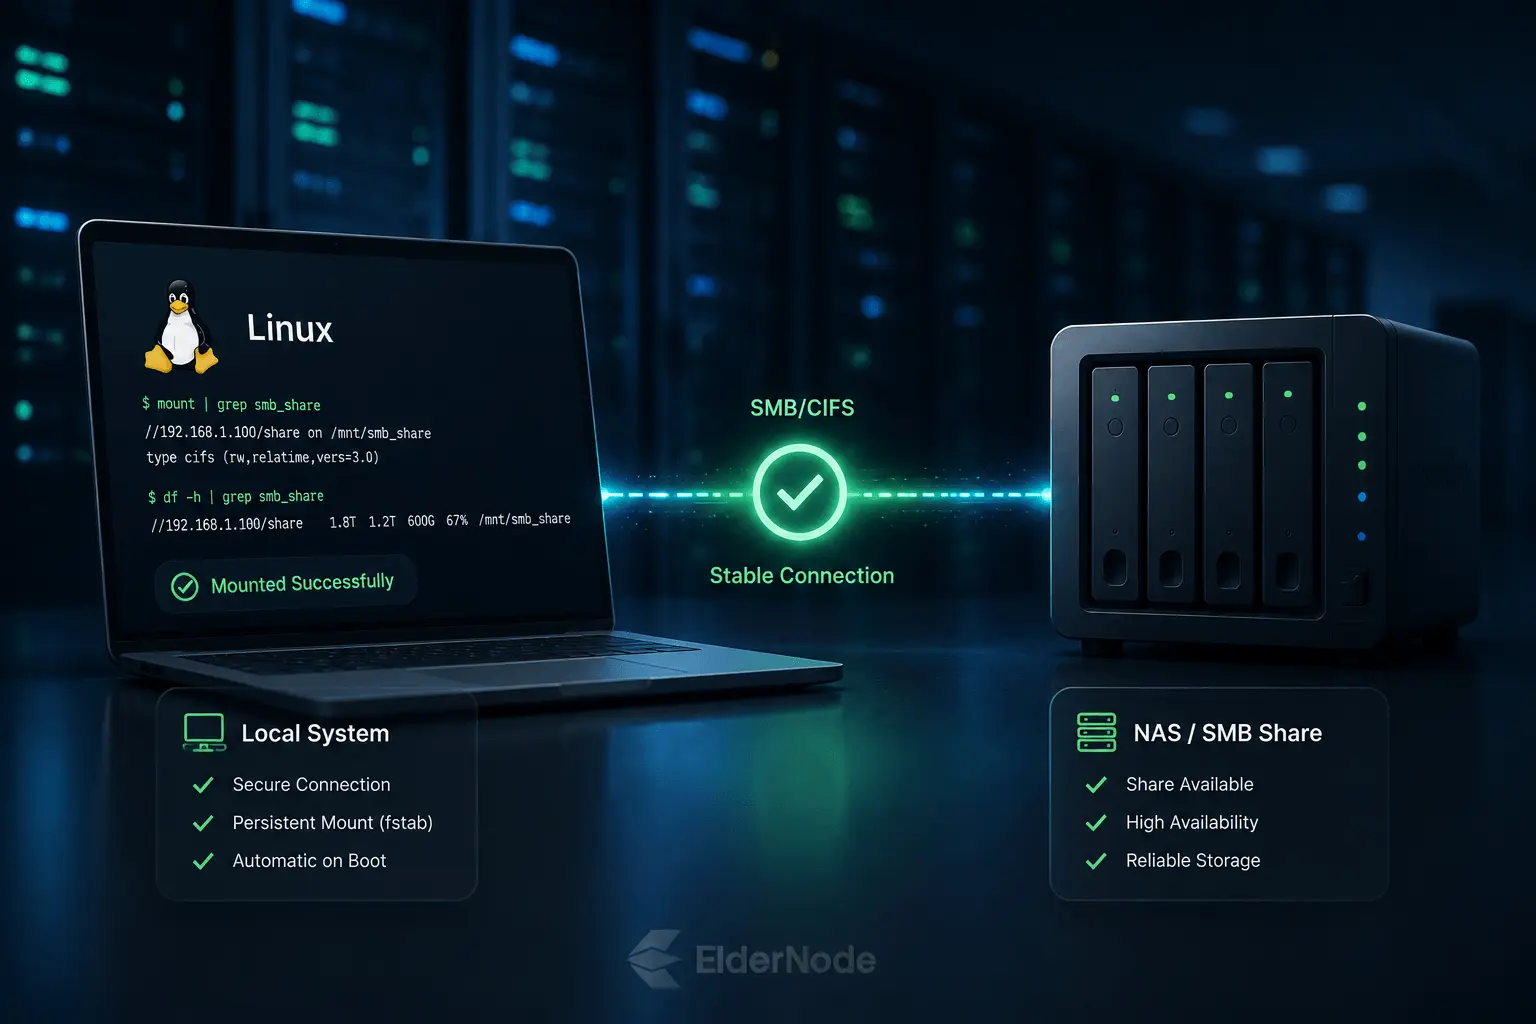
Getting your network drives to talk to Linux like this really bridges the gap between different worlds, especially if you’re juggling a NAS or moving files between Windows and Linux.
Once configured, the SMB share will mount automatically at boot and remain available as a persistent filesystem.and remain available as a persistent filesystem. Whether you’re setting up a home media hub, managing backups, or just need a consistent workspace, everything will be exactly where you expect it the moment you log in.
It’s one of those “set it and forget it” setups that makes your daily workflow feel a whole lot smoother.