How to Install and Configure Nikto on Ubuntu 20.04


How to Install and Configure Nikto on Ubuntu 20.04 Nikto is an open-source web server scanner written in Perl that can detect over 6,700 vulnerabilities. It scans for outdated server software, misconfigurations, and various security issues. Nikto performs specific public and server-type checks, records cookies received from the server, and analyzes HTTP server settings, the presence of multiple files, and installed software. Designed for speed, this tool runs all scans as quickly as possible. This tutorial takes you through the entire process of setting up and tuning Nikto on Ubuntu 20.04, so you can get it running fast and start scanning your server for potential security issues without hassle. You can also check the available Ubuntu VPS packages from Eldernode to run Nikto efficiently.
What is Nikto and What Does It Do?
Nikto’s been around forever seriously, it’s one of those tools you hear about early on if you hang around security folks. It’s small, quick, and scans for all sorts of stuff: outdated server software, misconfigs, and a big list of known vulnerabilities. Run it on a target, and it’ll spit out a report showing what’s wrong.
Now, here’s the catch Nikto’s not shy. If the site you’re scanning has an intrusion detection system, it’ll almost certainly notice you. That’s by design; this tool was built for open, above-board security testing, not for sneaking around.
Install Nikto on Ubuntu 20.04
First thing: update the package list so you’re not pulling anything outdated. In the terminal, type:
sudo apt-get update
sudo apt-get upgrade
These commands will help you install Nikto on Ubuntu 20.04 in just a few seconds:
sudo apt-get install nikto -y
After running this command, you will have successfully installed Nikto on Ubuntu 20.04 and can start scanning your server right away.
To check if Nikto is installed correctly and also its version, you can run the following command:
nikto
How to Configure Nikto on Ubuntu 20.04
Once you’ve got Nikto installed, you can play around with the settings to match what you’re scanning. Let’s say your server is running a few different sites on separate ports you don’t have to scan them one by one. You can hit multiple ports in a single command, like this:
nikto -h Your_IP_Address -p 8080,8888
Note that you can specify a range of ports in port1-portN format:
nikto -h Your_IP_Address -p 8080-8888
You can also enter the URL you want instead of the IP address:
nikto -h example.com
nikto -h https://example.com
Note that you can also specify a port when using the URL:
nikto -h example.com -p 8080
nikto -h https://example.com -p 8443
Now we want to go to the proxy settings. If you are using a proxy server, you can use the -useproxy option to ask Nikto to use a proxy. Note that you can set proxy details in the Nikto configuration file, /etc/nikto/config.txt. You can also set it on the command line as shown below:
PROXYHOST=Your_IP_Address
PROXYPORT=3128
PROXYUSER=username
PROXYPASS=password
Once you have configured the Nikto proxy, you can now run it as follows:
nikto -h Your_IP_Address -useproxy
In the next step, you must do the following to determine the details of the proxy connection on the command line:
nikto -h Your_IP_Address -useproxy http://id:password@Your_IP_Address:3128/
nikto -h Your_IP_Address -useproxy http://@Your_IP_Address:3128/
The interesting thing to note is that Nikto can export scan results in various formats such as CSV, HTML, XML, NBE, text. To do this you must use the -o/-output and -Format commands as in the following:
nikto -h YOUR_IP_Address -o test.html -F html
How to use Nikto on Ubuntu 20.04
With Nikto set up and ready, it’s time to try a quick scan. Pick a target host this could be an IP address or a domain name and let’s see what it finds. Replace the placeholder in the example below with your actual target:
nikto -h Your_IP_Address
Or
nikto -host Your_IP_Address
Example Nikto Scan Output (Real Test)
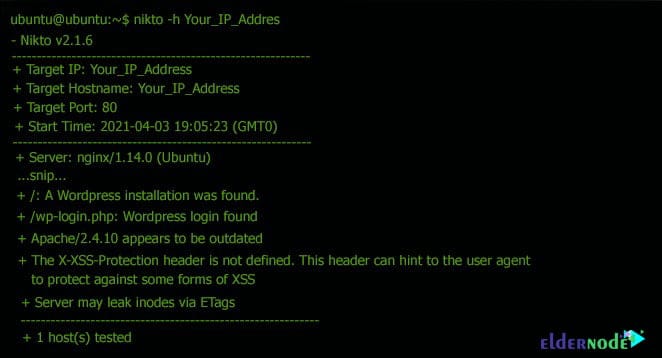
I figured it’d be better to show you what Nikto actually spits out, so I ran it on one of my local test boxes.
This was a fresh Ubuntu 20.04 install where I’d left a couple of things messy on purpose just to see if Nikto would notice.
Nikto v2.1.6

Target IP: 192.168.1.10

Target Hostname: test.local

Server: Apache/2.4.41 (Ubuntu)

Retrieved x-powered-by header: PHP/7.4.3

OSVDB-3092: /test/: Directory indexing found.

OSVDB-3092: /phpmyadmin/: phpMyAdmin is publicly accessible.

Scan completed in 00:23 minutes.
It didn’t disappoint spotted the outdated PHP version right away, called out an open directory, and even pointed to a phpMyAdmin instance I’d “forgotten” to hide.
If this was a real production server, that would’ve been a big red flag.
Conclusion
Nikto might be old-school, but it’s still one of the most practical tools for quickly spotting issues on a web server. We walked through what it does and how to get it running on Ubuntu 20.04 from installation to basic configuration.
By following these steps to install and configure Nikto on Ubuntu 20.04, you can quickly identify security issues on your web server.