Special Offer
 How To Install Samba On Ubuntu 20.04


Samba is what people usually install when they need a Linux server to work with Windows systems. Without it, sharing files between them can be annoying or just not work the way you expect.
Once Samba is set up, your Ubuntu server shows up on the network like a normal Windows machine. You can open shared folders, move files back and forth, and even share printers if needed.
In this guide, I’ll go through the steps to install and set up Samba on Ubuntu 20.04. You don’t need anything special to follow along, a basic Ubuntu VPS is enough.
Before you start, make sure you’re using a non-root user with sudo access.
If your server is freshly installed, it’s a good idea to go through the basic setup first (like creating a user and securing SSH).
Now let’s set it up step by step on Ubuntu 20.04.
Install Samba On Ubuntu 20.04
First, run the following commands to install Samba:
sudo apt update
sudo apt install samba
You can now check if you have installed it successfully or not. So, type:
whereis samba
If you see output like this, it means it’s installed.
samba: /usr/sbin/samba /usr/lib/samba /etc/samba /usr/share/samba /usr/share/man/man7/samba.7.gz /usr/share/man/man8/samba.8.gz
Create a Shared Folder
In this way, you can create a directory for it to share. So run:
mkdir /home/<username>/sambashare/
Once you run the above command, it will create a new folder sambashare in your home directory which you will share later.
The configuration file for Samba is located at /etc/samba/smb.conf. Edit the file with the command below to add the new directory as a share.
Configure Samba Share
sudo nano /etc/samba/smb.conf
Then, you must add the following lines to the bottom of the file:
[sambashare]
comment = Samba on Ubuntu
path = /home/username/sambashare
read only = no
browsable = yes
Here’s what those options mean:
comment: A brief description of your share.
path: the directory of your share.
read-only: Permission to modify the contents of the shared folder is only granted when the value of this directive is no.
browsable: When set to yes, file manager like Ubuntu’s default file manager will list this share under ”Network”
Now, you can press Ctrl-O to save and Ctrl-X to exit from the nano text editor.
Restart Samba and Allow Firewall
While you have your new share configured, you can save it and restart Samba for it to take effect:
sudo service smbd restart
Run the command below to update the firewall rules to allow Samba traffic:
sudo ufw allow samba
Create a Samba User
Samba does not use the system account password, so you need to set up a Samba password for your user account:
sudo smbpasswd -a username
Note: To let the username be saved, it should belong to a system account.
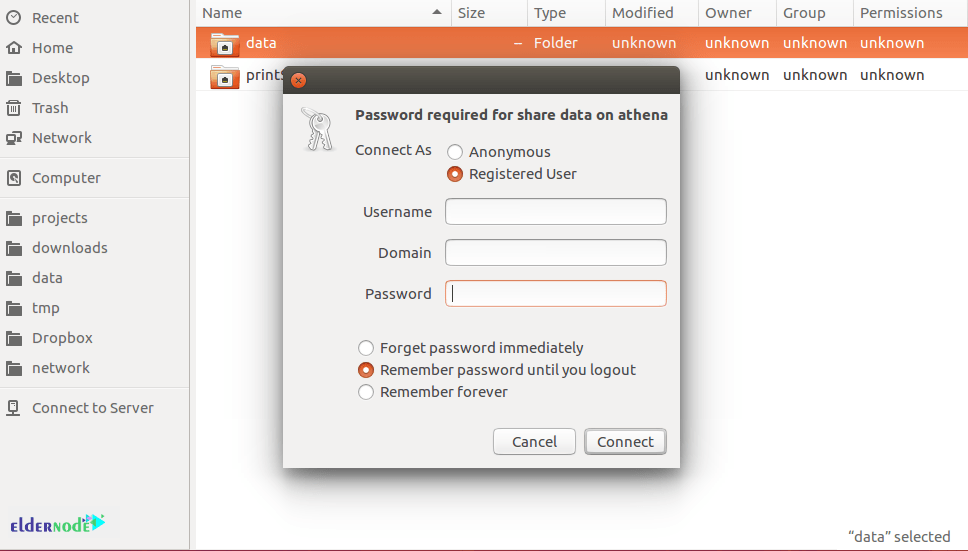
Connect to the Share
Since you are working on Ubuntu, you should open up the default file manager and click Connect to Server. Then enter smb://ip-address/sambashare.
Please be aware that ip-address is the Samba server IP address and sambashare is the name of the share.
Finally, you will be prompted for your credentials. So, enter them to connect.
This setup is commonly used for sharing files between a server and personal devices, or between Linux and Windows systems on a small network.
Conclusion
At this point, just try it from another system on the same network. Open the share, drop a file in, download it back, make sure it actually works and not just shows up.
If you don’t see it, or you can’t open it, go back to the config file and read it slowly. Most issues come from a small typo in the path, a missing bracket, or permissions on the folder. Also make sure you restarted the Samba service after saving changes.
Once it works, you can just leave it like that. If later you want another share, just copy the same block in the config file and change the path and name.