Special Offer
 How to Update GeForce Graphic Card on Linux in Terminal


If you want your GeForce card running at its best, whether it’s for gaming, 3D rendering, or machine learning, knowing how to update GeForce graphic card on Linux in terminal can make a huge difference. For best results, always remember the importance of learning how to update GeForce graphic card on Linux in terminal. While GUI tools exist, nothing gives you the same level of control, speed, and troubleshooting power as the command line.
In this tutorial, I’ll walk you through the process step by step. Whether you’re on Ubuntu, Debian, or a rolling release like Arch, by the end, your GPU will be fully updated, stable, and ready to perform at its peak. Furthermore, users interested in maximizing performance should update GeForce graphic card on Linux in terminal whenever new drivers are released.
Understanding Your Driver Options
Before you start running any commands, it’s a good idea to pause for a moment and get a feel for which driver you’re actually using on Linux.
Most Linux setups come with a driver called Nouveau. For everyday things, like checking emails, browsing, or watching videos, it’s fine. But if you want to get the most out of your GeForce card, especially for gaming or heavy workloads, you’ll need the official NVIDIA drivers.
If you’re into gaming, 3D work, or anything that uses CUDA, you’ll notice it can’t keep up. That’s when the official NVIDIA drivers come in. They’re made specifically for your GPU, so you get the best performance, proper power management, and all the features your card can actually handle.
Step 1: Pre-Installation System Cleanup
Okay, before you slap a new driver on, let’s make sure your system isn’t carrying old baggage. Old NVIDIA stuff lying around can cause weird conflicts.
Check what’s running:
Open a terminal and see what driver your system is using. Try:
glxinfo -B
Or check which NVIDIA modules are loaded:
lsmod | grep nvidia
This just tells you what’s active right now.
Pick the right driver:
If you’re not sure which version you need, Debian and Ubuntu have a neat little tool called nvidia-detector. Just run it:
nvidia-detector
It’ll spit out something like nvidia-driver-535, which is the one your card actually wants.
Clean out the old stuff:
Before installing, get rid of any old NVIDIA drivers so nothing fights with the new one. Run:
sudo apt-get purge nvidia*

sudo apt-get autoremove
All clean? Good. Now you’re ready to install the new driver. In short, these steps are essential whenever you update GeForce graphic card on Linux in terminal.
Step 2: Securing Essential Dependencies
Alright, before we install the driver itself, we need to make sure your system has the stuff it needs to handle it. Modern NVIDIA drivers need to build kernel modules that match your current Linux kernel perfectly. If they don’t, you might boot up and… nothing, no desktop, no GUI. Nightmare.
To avoid that, we need two things:
Linux headers, these let the driver compile the modules correctly.
DKMS (Dynamic Kernel Module Support), think of it as a safety net. Whenever your kernel gets updated, DKMS automatically rebuilds the
NVIDIA modules in the background so you don’t have to worry about it.
On Ubuntu or Debian, you can get both with one command in the terminal:
sudo apt install linux-headers-$(uname -r) dkms
Once that’s done, your system is ready to handle the new driver without drama.
Step 3: Installation Methods
Alright, now it’s time to actually put the driver on your system. There are a couple of ways to do it, and people argue about which is best. You could download the .run file straight from NVIDIA. That gives you the newest driver immediately, but honestly, it can be messy. It bypasses your package manager, and later updates can break things.
A much safer approach is to stick with your Linux distro’s official repositories or a PPA if you’re on Ubuntu/Debian. It’s easier, safer, and you won’t have to deal with random errors later.
For Ubuntu/Debian users:
Here’s the simple way:
Add the graphics drivers PPA:
sudo add-apt-repository ppa:graphics-drivers/ppa
Update your packages:
sudo apt update
Install the driver your card needs (from nvidia-detector):
sudo apt install nvidia-driver-535
(Swap 535 with whatever version your tool recommended.)
For Arch users:
Arch makes it easy. Just run:
sudo pacman -S nvidia nvidia-utils lib32-nvidia-utils
If you’re using a custom kernel, like linux-zen, grab nvidia-dkms instead so the modules compile correctly.
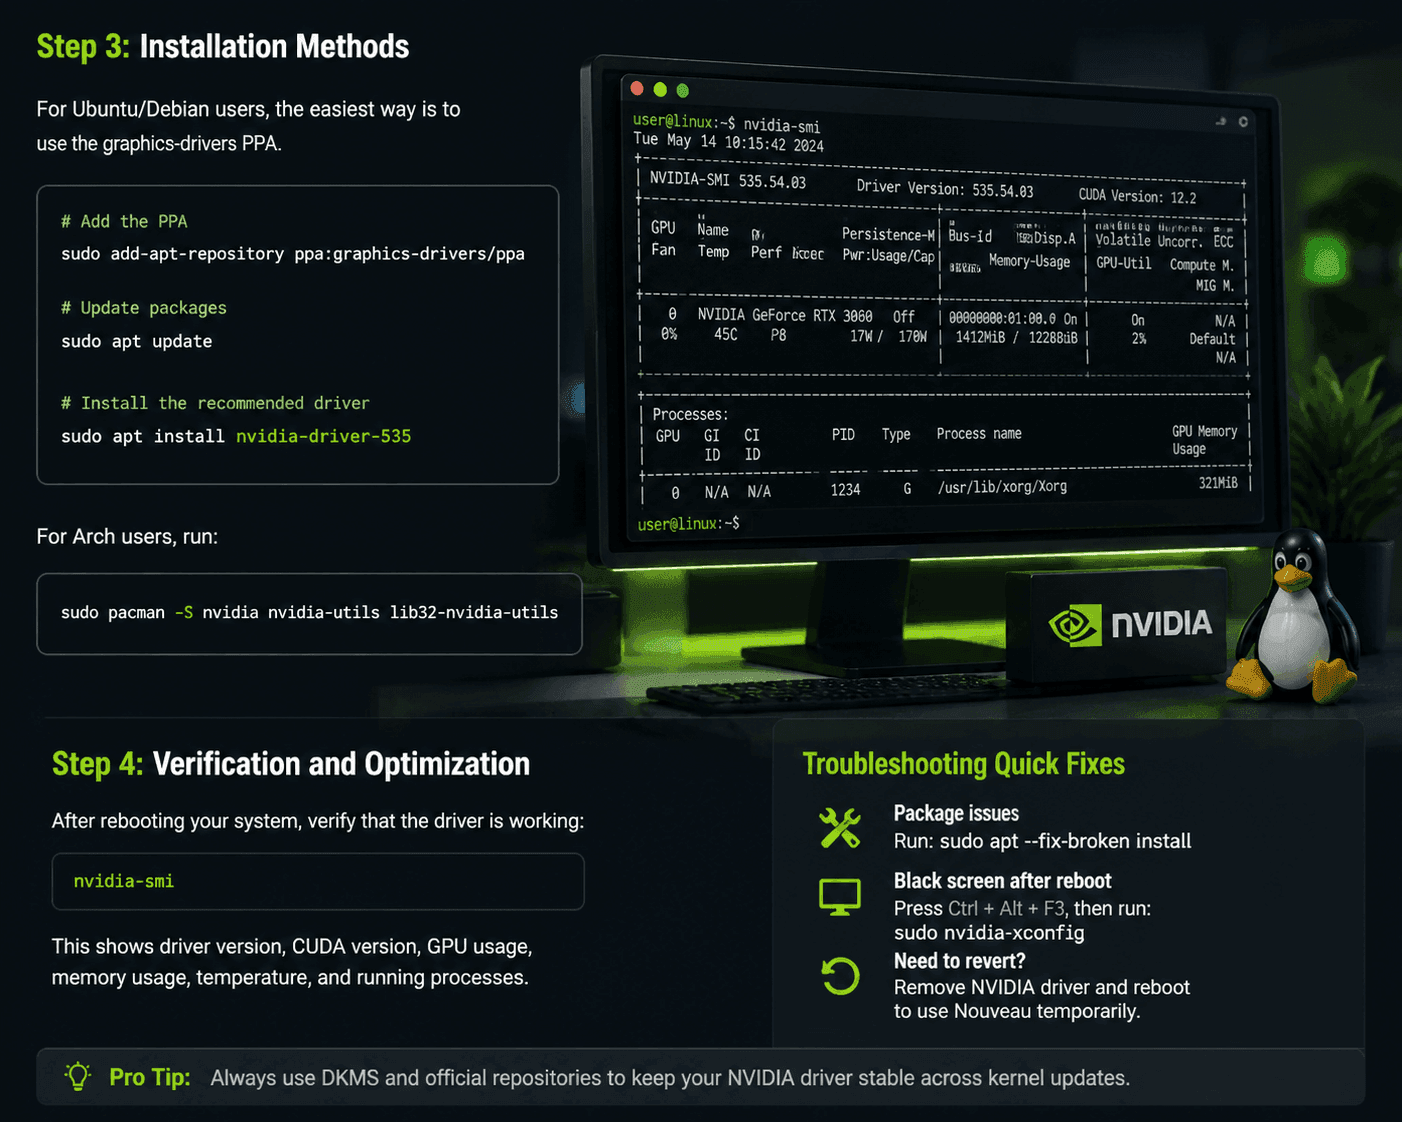
Step 4: Verification and Optimization
Okay, once you’ve installed everything, the first thing to do is just restart your computer:
sudo reboot
After it boots back up, we need to make sure the NVIDIA driver actually took. Open a terminal and type:
nvidia-smi
You should see a table appear. It shows your driver version, the CUDA version, which processes are using the GPU, how much VRAM is being used, and even the temperature. If that table shows up, you’re good, your driver is installed and running.
Troubleshooting Common CLI Hiccups
Okay, if things go a bit sideways after installing your driver, don’t sweat it.
Package issues:
If the installer complains or stops midway, just run:
sudo apt --fix-broken install
This usually sorts out any leftover problems.
Black screen:
If your screen goes blank after reboot:
Hit Ctrl + Alt + F3 to switch to a text console.
Try regenerating the X11 config with:
sudo nvidia-xconfig
If it still misbehaves, you can remove the new NVIDIA driver and temporarily go back to Nouveau to get your desktop back.
All set, most problems are solved in a couple of minutes.
Final Thoughts
Managing NVIDIA drivers from the terminal might sound tricky at first, but once you do it a couple of times, it becomes second nature.
Just keep your commands handy, make sure DKMS is set up, and stick with the official repositories. No random .run files. Your system will stay stable, fast, and your GPU ready for anything you throw at it, gaming, rendering, or crunching data. Ultimately, the best way to ensure success is to routinely update GeForce graphic card on Linux in terminal.