How to Install Moodle on AlmaLinux in 5 Easy Steps [2025 Guide]


I recently had to Install Moodle on AlmaLinux server for a small training project, and honestly, it turned out a lot smoother than I expected. If you’ve ever thought about hosting your own LMS instead of relying on third-party platforms, Moodle’s a great place to start it’s free, super flexible, and works well on most Linux servers.
In this post, I’ll walk you through exactly how I got it up and running in 5 steps.
Also, if you’re looking for a solid Linux VPS to host it, Eldernode has some decent options worth checking out.
What is Moodle?
It’s basically a free platform that lets you build your own online classroom. Think assignments, quizzes, discussion boards the whole package. It’s open-source, so you can tweak it as much as you want. Schools use it, universities use it, and a lot of companies do too. If you’ve ever used Google Classroom or Canvas, it’s kinda like that, but way more customizable and self-hosted.
Requirements to Install Moodle on AlmaLinux
Before doing anything, you need to install the following requirements:
1–> Install PHP 7.4 and PHP 8 on AlmaLinux
2–> Install SQL Server on AlmaLinux
3–> Install basic utility packages if they are not already installed:
sudo dnf install wget curl nano unzip yum-utils -y
1- Configuring Firewall on AlmaLinux
In the first step, you should configure the Firewall. To do this, check the status of the Firewall using the command below:
sudo firewall-cmd --state
You can list the active services and ports on the Firewall as shown below:
sudo firewall-cmd --permanent --list-services
Now you need to open HTTP and HTTPS ports by running the following command. Because Moodle needs them to function:
sudo firewall-cmd --add-service=http --permanent
sudo firewall-cmd --add-service=https --permanent
Lastly, reload the Firewall to apply the changes as shown below:
sudo firewall-cmd --reload
In my case, I had to run the reload command twice for some reason, the first time didn’t apply the changes properly.
2- Installing Nginx on AlmaLinux
In this step, you can install the latest Nginx version by downloading the official Nginx repository.
Now you should create the official Nginx repository. To do this, create an open the /etc/yum.repos.d/nginx.repo file with your desired text editor:
sudo nano /etc/yum.repos.d/nginx.repo
Once you have opened the file, add the following code in it:
[nginx-stable]
name=nginx stable repo
baseurl=http://nginx.org/packages/centos/$releasever/$basearch/
gpgcheck=1
enabled=1
gpgkey=https://nginx.org/keys/nginx_signing.key
module_hotfixes=true

[nginx-mainline]
name=nginx mainline repo
baseurl=http://nginx.org/packages/mainline/centos/$releasever/$basearch/
gpgcheck=1
enabled=0
gpgkey=https://nginx.org/keys/nginx_signing.key
module_hotfixes=true
Press Ctrl+X to save the file.
It’s time to install the Nginx server as shown below:
sudo dnf install nginx
If you want to verify the installation, the following command can help you:
nginx -v
3- Installing and Configuring Moodle on AlmaLinux
First of all, you need to create the public directory for Install Moodle on AlmaLinux:
sudo mkdir /var/www/html/moodle
In order for the logged-in user to have access to the directory, you must allow as follows:
sudo chown -R $USER:$USER /var/www/html/moodle
And switch to the public directory:
cd /var/www/html/moodle
Moodle needs Git to grab the application files. To install Git, run the command below:
sudo dnf install git
Now you should clone the Moodle Github repository as shown below:
git clone https://github.com/moodle/moodle.git
If you want to check the available branches list, run the command below:
git branch -a
Then make a local branch called MOODLE_400_STABLE and set it to track the remote branch as shown below:
git branch --track MOODLE_400_STABLE origin/MOODLE_400_STABLE
Run the command below to switch to the newly created local branch:
git checkout MOODLE_400_STABLE
Now you should create a data directory for Moodle using the following command:
sudo mkdir /var/moodledata
Next, give proper permissions to the Moodle data directory as shown below:
sudo chown -R nginx /var/moodledata
sudo chmod -R 775 /var/moodledata
And give write permissions to the Moodle directory:
sudo chmod -R 755 /var/www/html/moodle
It’s time to configure Moodle. To do this, navigate to the Moodle directory:
cd /var/www/html/moodle
Now you should create the Moodle configuration file. To do this, copy the sample configuration file:
cp config-dist.php config.php
Open the configuration file to edit it:
nano config.php
Find the database configuration section and configure the database that all Moodle data will be stored as follows:
CFG->dbtype = 'mysqli'; // 'pgsql', 'mariadb', 'mysqli', 'auroramysql', 'sqlsrv' or 'oci'
CFG->dblibrary = 'native'; // 'native' only at the moment
CFG->dbhost = 'localhost'; // eg 'localhost' or 'db.isp.com' or IP
CFG->dbname = 'moodledb'; // database name, eg moodle
CFG->dbuser = 'moodleuser'; // your database username
CFG->dbpass = 'YourPassword23!'; // your database password
CFG->prefix = 'mdl_'; // prefix to use for all table names
Now you need to configure the location of the Moodle domain name and the data directory:
CFG->wwwroot = 'https://moodle.sample.com';
CFG->dataroot = '/var/moodledata';
Lastly, save the file and close it.
4- Installing SSL and Configuring Nginx on AlmaLinux
Firstly, install the Certbot tool to generate SSL certificates using Let’s Encrypt API using the command below:
sudo dnf install certbot
Now generate the SSL certificate as shown below. Note that the following code will download a certificate to the /etc/letsencrypt/live/moodle.example.com directory on your server:
sudo certbot certonly --standalone --agree-tos --no-eff-email --staple-ocsp --preferred-challenges http -m [email protected] -d moodle.sample.com
Run the following command to generate a Diffie-Hellman group certificate:
sudo openssl dhparam -out /etc/ssl/certs/dhparam.pem 4096
Then you should make a challenge web root directory for Let’s Encrypt auto-renewal as shown below:
sudo mkdir -p /var/lib/letsencrypt
Now the Cron Job is needed to be created to renew the SSL. To do this, create the /etc/cron.daily/certbot-renew file and open it with your desired text editor:
sudo nano /etc/cron.daily/certbot-renew
Add the following code to it:
#!/bin/sh
certbot renew --cert-name moodle.sample.com --webroot -w /var/lib/letsencrypt/ --post-hook "systemctl reload nginx"
Save the file and close it.
Then make the task file executable by changing the permissions on it as shown below:
sudo chmod +x /etc/cron.daily/certbot-renew
It’s time to configure Nginx. To do this create the /etc/nginx/conf.d/moodle.conf and open it with your desired text editor:
sudo nano /etc/nginx/conf.d/moodle.conf
And add the following code to it:
# Redirect all non-encrypted to encrypted
server {
    listen 80;
    listen [::]:80;
    server_name moodle.example.com;
    return 301 https://$host$request_uri;
}

server {
    listen 443 ssl http2;
    listen [::]:443 ssl http2;

    server_name moodle.example.com;
    root   /var/www/html/moodle;
    index  index.php;

    ssl_certificate     /etc/letsencrypt/live/moodle.example1.com/fullchain.pem;
    ssl_certificate_key /etc/letsencrypt/live/moodle.example.com/privkey.pem;
    ssl_trusted_certificate /etc/letsencrypt/live/moodle.example.com/chain.pem;
    ssl_session_timeout 1d;
    ssl_session_cache shared:MozSSL:10m;
    ssl_session_tickets off;
    ssl_stapling on;
    ssl_stapling_verify on;
    ssl_dhparam /etc/ssl/certs/dhparam.pem;

    ssl_protocols TLSv1.2 TLSv1.3;
    ssl_ciphers ECDHE-ECDSA-AES128-GCM-SHA256:ECDHE-RSA-AES128-GCM-SHA256:ECDHE-ECDSA-AES256-GCM-SHA384:ECDHE-RSA-AES256-GCM-SHA384:ECDHE-ECDSA-CHACHA20-POLY1305:ECDHE-RSA-CHACHA20-POLY1305:DHE-RSA-AES128-GCM-SHA256:DHE-RSA-AES256-GCM-SHA384;

    access_log /var/log/nginx/moodle.access.log main;
    error_log  /var/log/nginx/moodle.error.log;

    client_max_body_size 25M;

    location / {
        try_files $uri $uri/ /index.php?$query_string;
    }

    location ~ ^(.+\.php)(.*)$ {
        fastcgi_split_path_info ^(.+\.php)(.*)$;
        fastcgi_index index.php;
        fastcgi_pass unix:/run/php-fpm/www.sock;
        include /etc/nginx/mime.types;
        include fastcgi_params;
        fastcgi_param  PATH_INFO  $fastcgi_path_info;
        fastcgi_param  SCRIPT_FILENAME $document_root$fastcgi_script_name;
    }

    # Hide all dot files but allow "Well-Known URIs" as per RFC 5785
	location ~ /\.(?!well-known).* {
    	return 404;
	}

	# This should be after the php fpm rule and very close to the last nginx ruleset.
	# Don't allow direct access to various internal files. See MDL-69333
	location ~ (/vendor/|/node_modules/|composer\.json|/readme|/README|readme\.txt|/upgrade\.txt|db/install\.xml|/fixtures/|/behat/|phpunit\.xml|\.lock|environment\.xml) {
     	deny all;
	    return 404;
	}
}
Save the file and close it.
In this case, open the /etc/nginx/nginx.conf file with your desired text editor:
sudo nano /etc/nginx/nginx.conf
And add the line below before the /etc/nginx/conf.d/*.conf; line:
server_names_hash_bucket_size 64;
Remember to save the file.
You should verify the Nginx configuration file syntax as shown below:
sudo nginx -t
Next, enable the new configuration by starting the Nginx service with the following command:
sudo systemctl enable nginx --now
Note: If you get the ”nginx: [emerg] open() “/var/run/nginx.pid” failed (13: Permission denied)” error, enter the following commands to fix it and start the Nginx again:
sudo ausearch -c 'nginx' --raw | audit2allow -M my-nginx
sudo semodule -X 300 -i my-nginx.pp
You should change the file security context for the web and data directory of Moodle as shown below:
sudo semanage fcontext -a -t httpd_sys_rw_content_t '/var/www/html/moodle'
sudo semanage fcontext -a -t httpd_sys_rw_content_t '/var/moodledata'
sudo restorecon -Rv '/var/www/html/moodle'
sudo restorecon -Rv '/var/moodledata'
Lastly, you need to configure SELinux to allow network connections from Moodle by running the command below:
sudo setsebool -P httpd_can_network_connect on
5- Accessing Moodle
First, navigate to the following URL:
https://moodle.sample.com
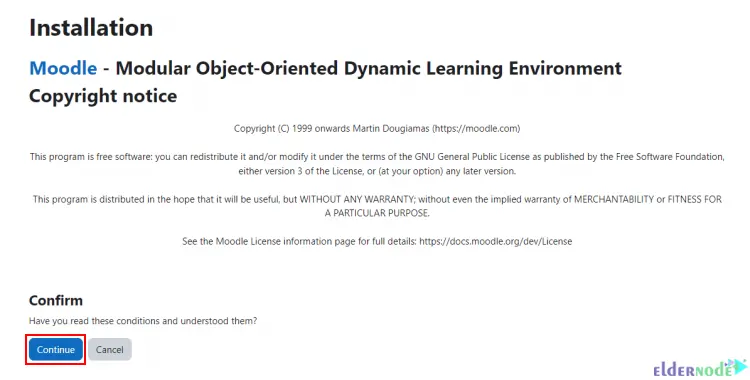
You should see the welcome screen. Click Continue:
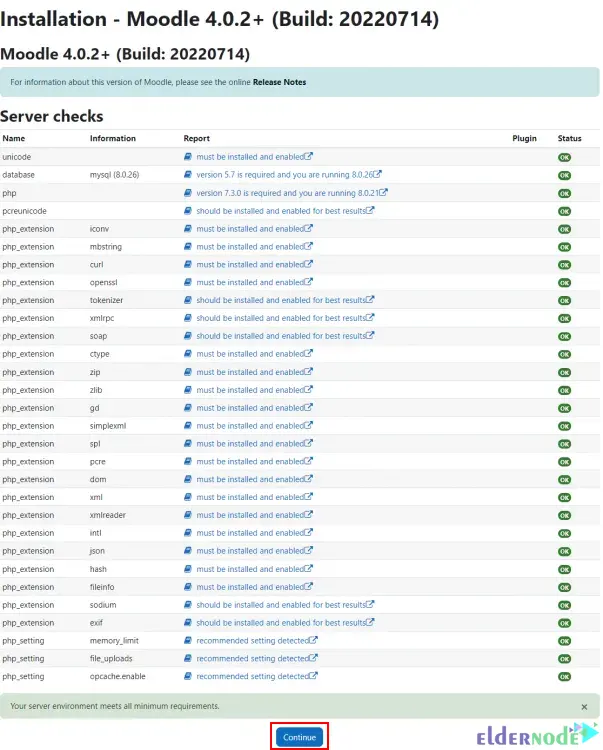
Now the installer checks for system requirements, press Continue to proceed:
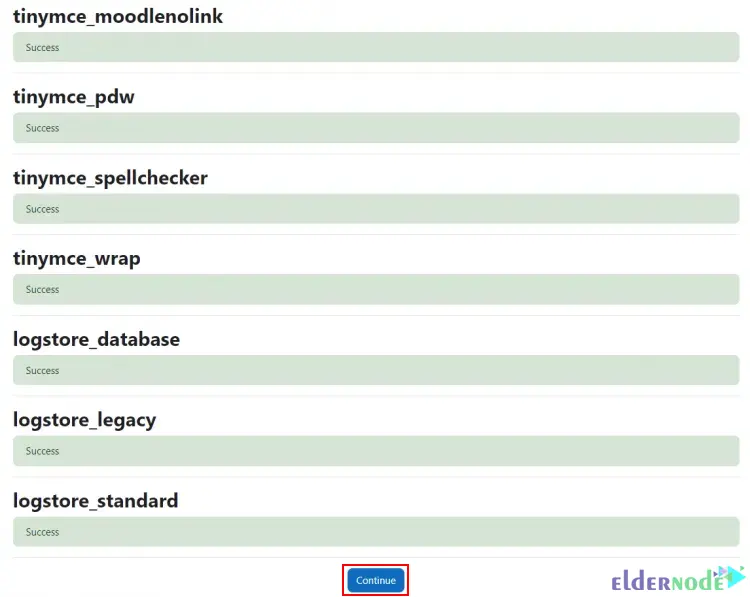
Next press Continue to install files and setup the database:
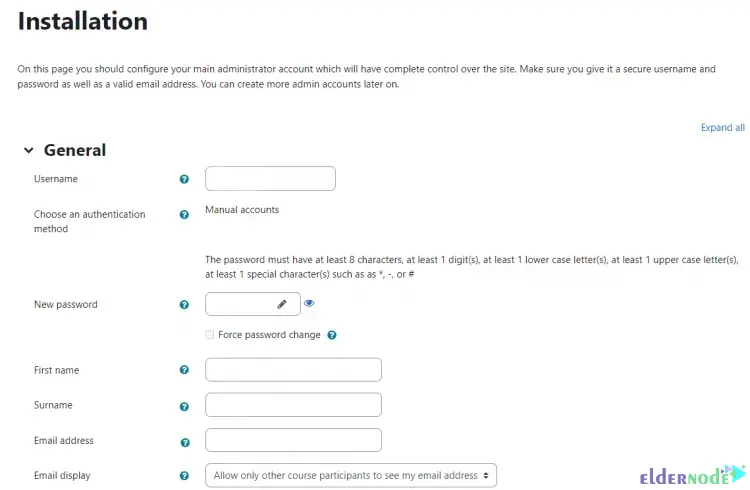
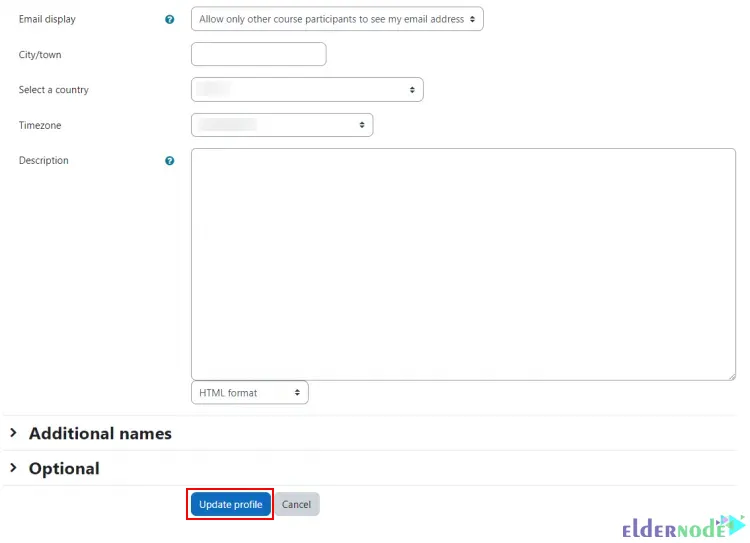
In this step, you should create an administrator account. To do this, fill in the account details and once it is finished, press Update profile:
***
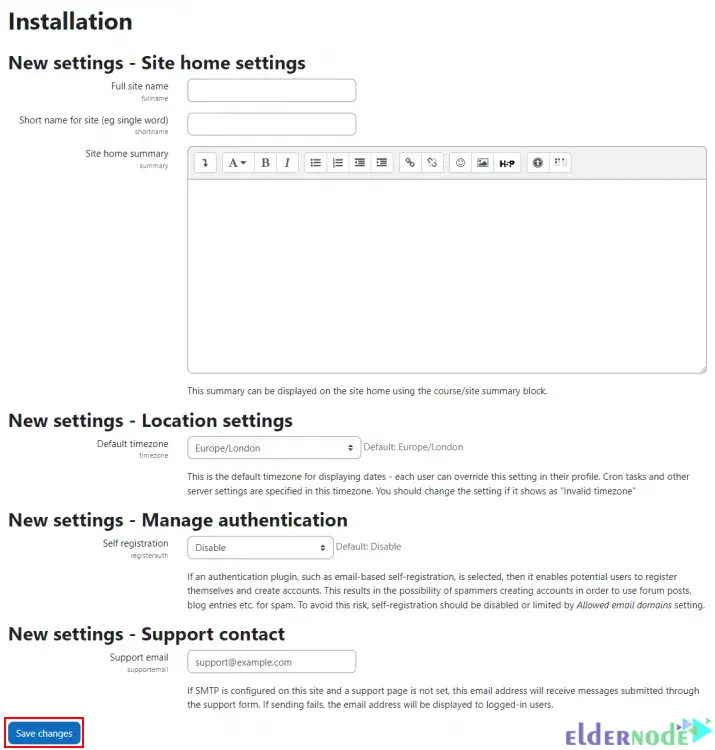
Now you should configure the front page settings of Moodle. After you configured, click on Save Changes:
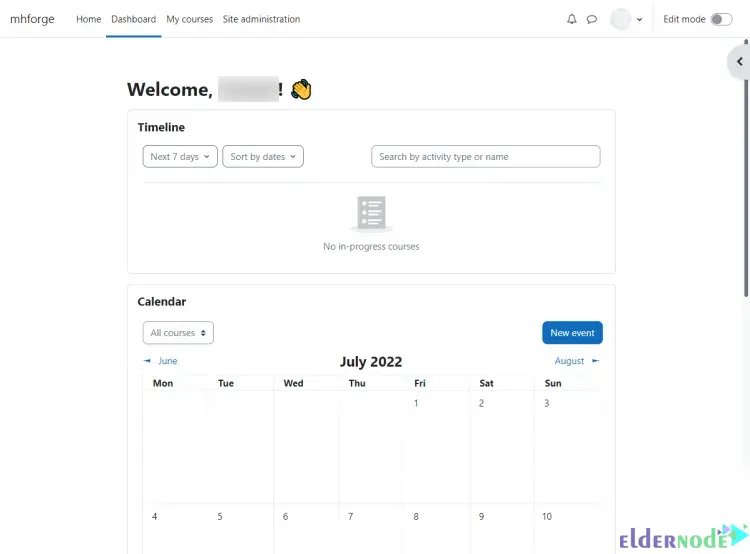
You will proceed to the Moodle dashboard which asks you to register your Moodle site with the company. You can click on Skip if you don’t want to register:
That’s it!
Conclusion
That’s it your Moodle site should now be up and running on AlmaLinux. I tried to keep this guide clear and beginner-friendly, but if you hit a snag or something doesn’t work the way it should, feel free to drop a comment below. I’ll do my best to help.
Also, if you still need a fast and reliable Linux VPS for hosting Moodle, Eldernode has some great options worth checking out.